1、SpringBoot 简介#
1.1 什么是 SpringBoot#
随着 Spring 不断的发展,涉及的领域越来越多,项目整合开发需要配合各种各样的文件,慢慢变得不那么易用简单,违背了最初的理念,甚至人称配置地狱。Spring Boot 正是在这样的一个背景下被抽象出来的开发框架,目的为了让大家更容易的使用 Spring 、更容易的集成各种常用的中间件、开源软件;
Spring Boot 基于 Spring 开发,Spirng Boot 本身并不提供 Spring 框架的核心特性以及扩展功能,只是用于快速、敏捷地开发新一代基于 Spring 框架的应用程序。也就是说,它并不是用来替代 Spring 的解决方案,而是和 Spring 框架紧密结合用于提升 Spring 开发者体验的工具。Spring Boot 以约定大于配置的核心思想,默认帮我们进行了很多设置,多数 Spring Boot 应用只需要很少的 Spring 配置。同时它集成了大量常用的第三方库配置(例如 Redis、MongoDB、Jpa、RabbitMQ、Quartz 等等),Spring Boot 应用中这些第三方库几乎可以零配置的开箱即用。
简单来说就是SpringBoot其实不是什么新的框架,它默认配置了很多框架的使用方式,就像maven整合了所有的jar包,spring boot整合了所有的框架 。
Spring Boot的主要优点:
- 为所有Spring开发者更快的入门
- 开箱即用,提供各种默认配置来简化项目配置
- 内嵌式容器简化Web项目
- 没有冗余代码生成和XML配置的要求
1.2 单体应用架构#
所谓单体应用架构(all in one)是指,我们将一个应用的中的所有应用服务都封装在一个应用中。
无论是ERP、CRM或是其他什么系统,你都把数据库访问,Web访问,等等各个功能放到一个war包内。
这样做的好处是,易于开发和测试;也十分方便部署;当需要扩展时,只需要将war复制多份,然后放到多个服务器上,再做个负载均衡就可以。
单体应用架构的缺点是,哪怕我要修改一个非常小的地方,我都需要停掉整个服务,重新打包、部署这个应用war包。特别是对于一个大型应用,我们不可能把所有内容都放在一个应用里面,我们如何维护、如何分工合作都是问题。
1.3 微服务架构#
微服务是什么? - 阮一峰的网络日志
all in one 的架构方式,我们把所有的功能单元放在一个应用里面。然后我们把整个应用部署到服务器上。如果负载能力不行,我们将整个应用进行水平复制,进行扩展,然后在负载均衡。
所谓微服务架构,就是打破之前 all in one 的架构方式,把每个功能元素独立出来。把独立出来的功能元素的动态组合,需要的功能元素才去拿来组合,需要多一些时可以整合多个功能元素。所以微服务架构是对功能元素进行复制,而没有对整个应用进行复制。
这样做的好处是:
- 节省了调用资源。
- 每个功能元素的服务都是一个可替换的、可独立升级的软件代码。
1.4 Hello,World - 第一个 SpringBoot 程序#
官网提供的创建网站:https://start.spring.io/
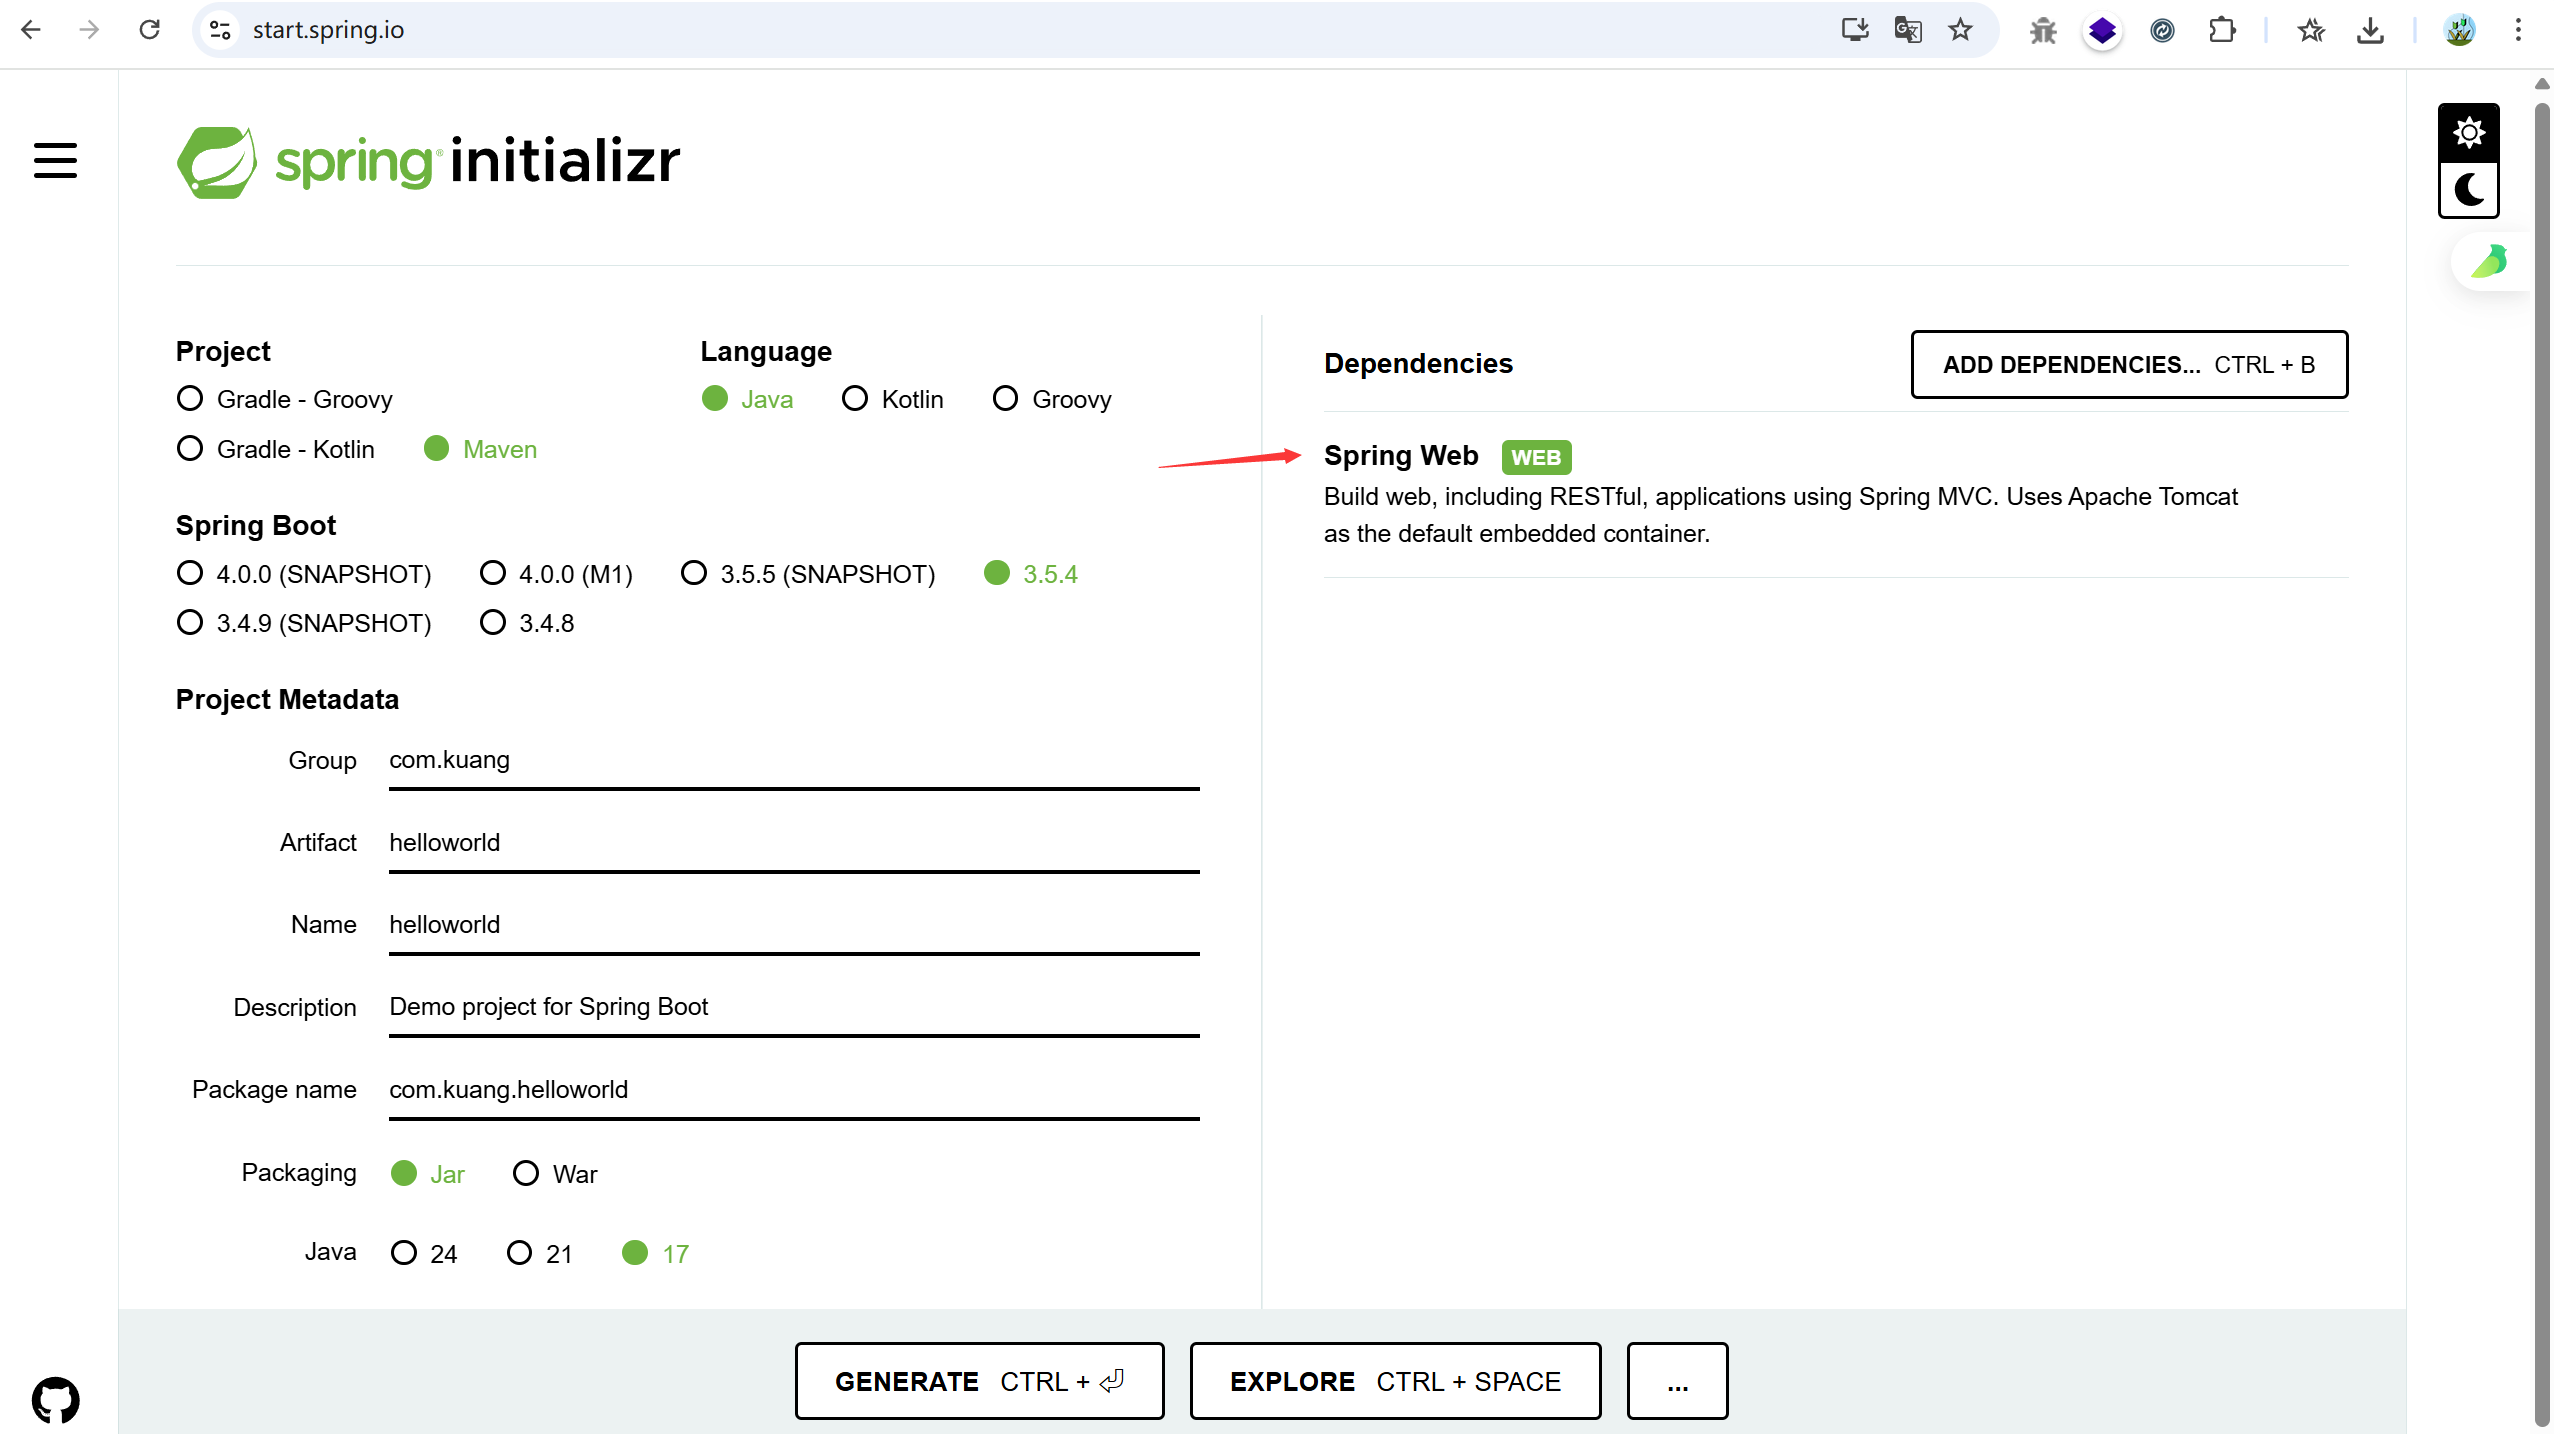
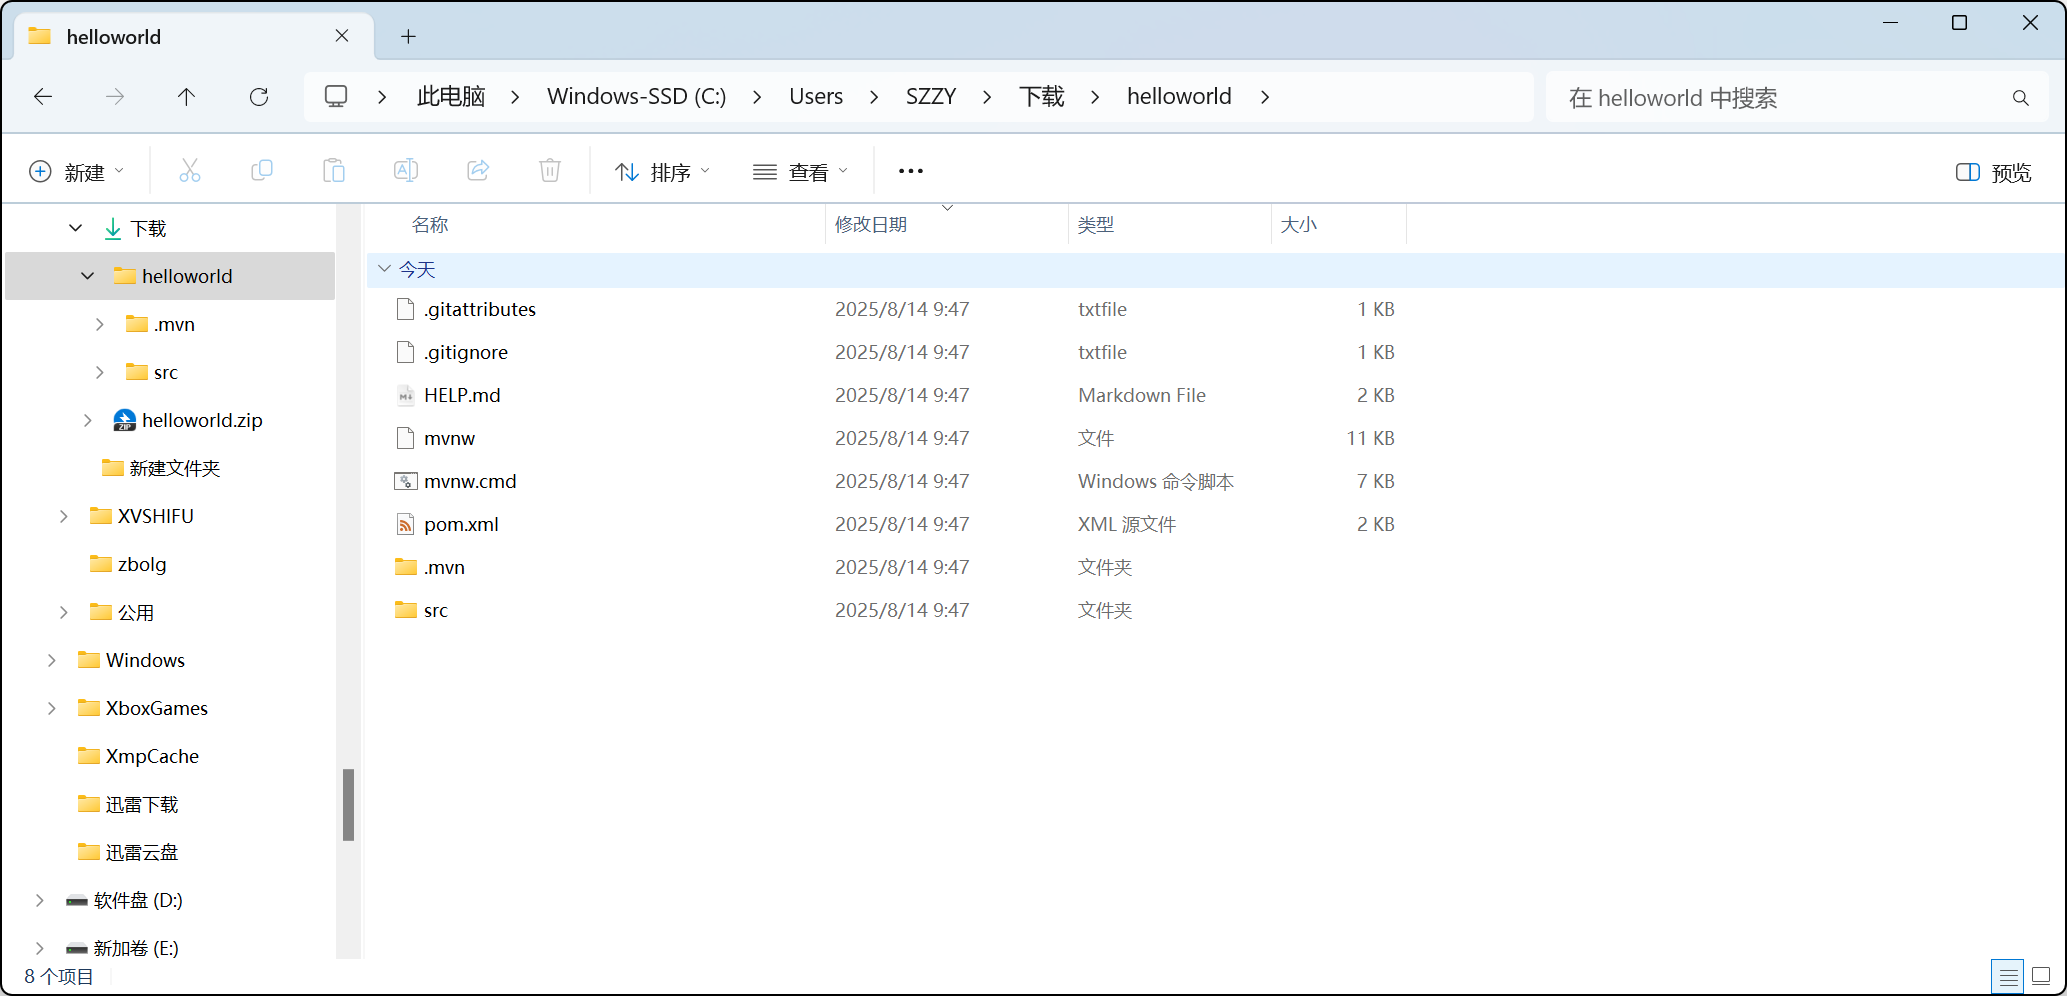
下载解压之后:
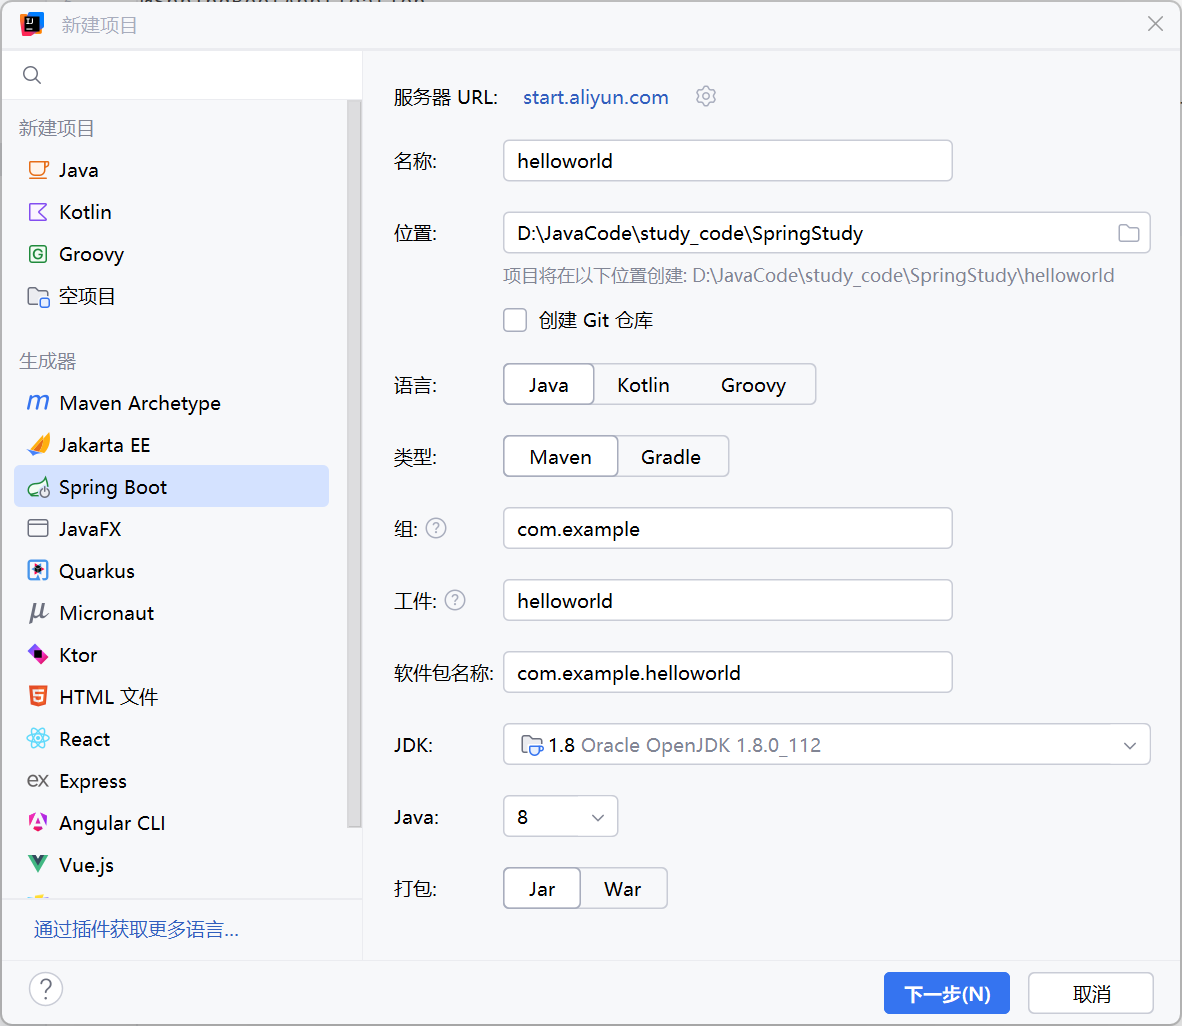
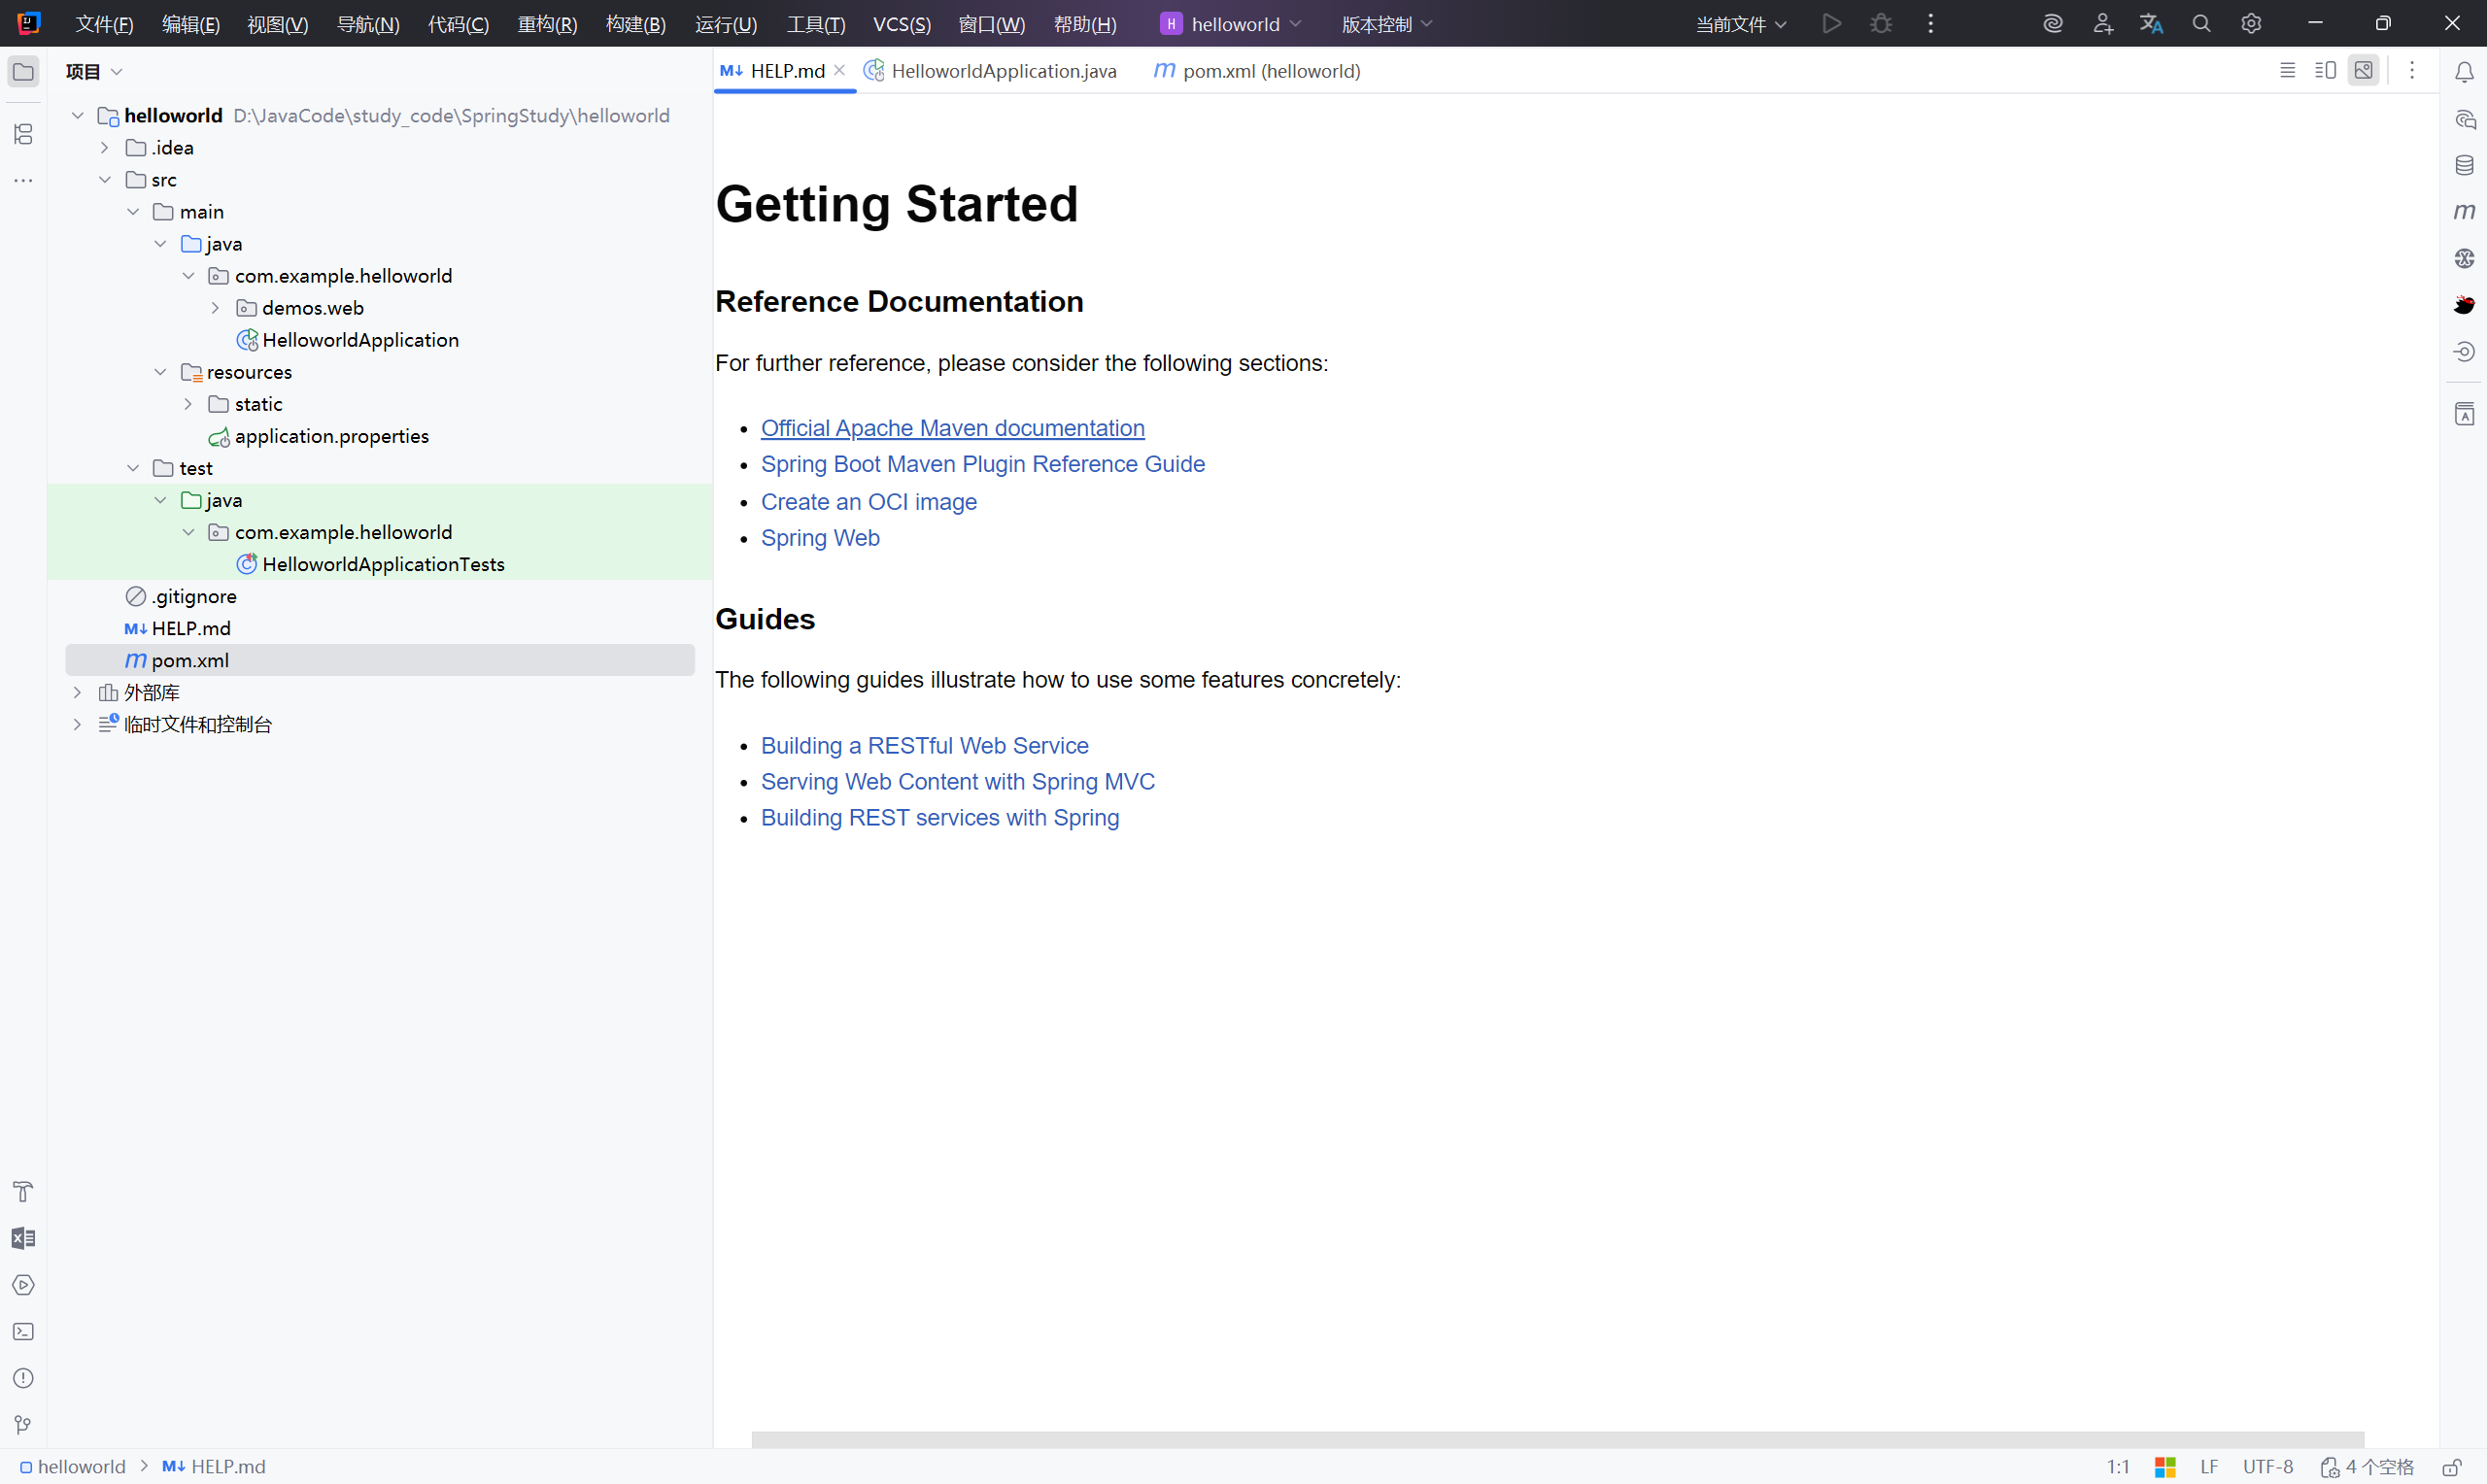
正常情况下,idea 创建新项目即可
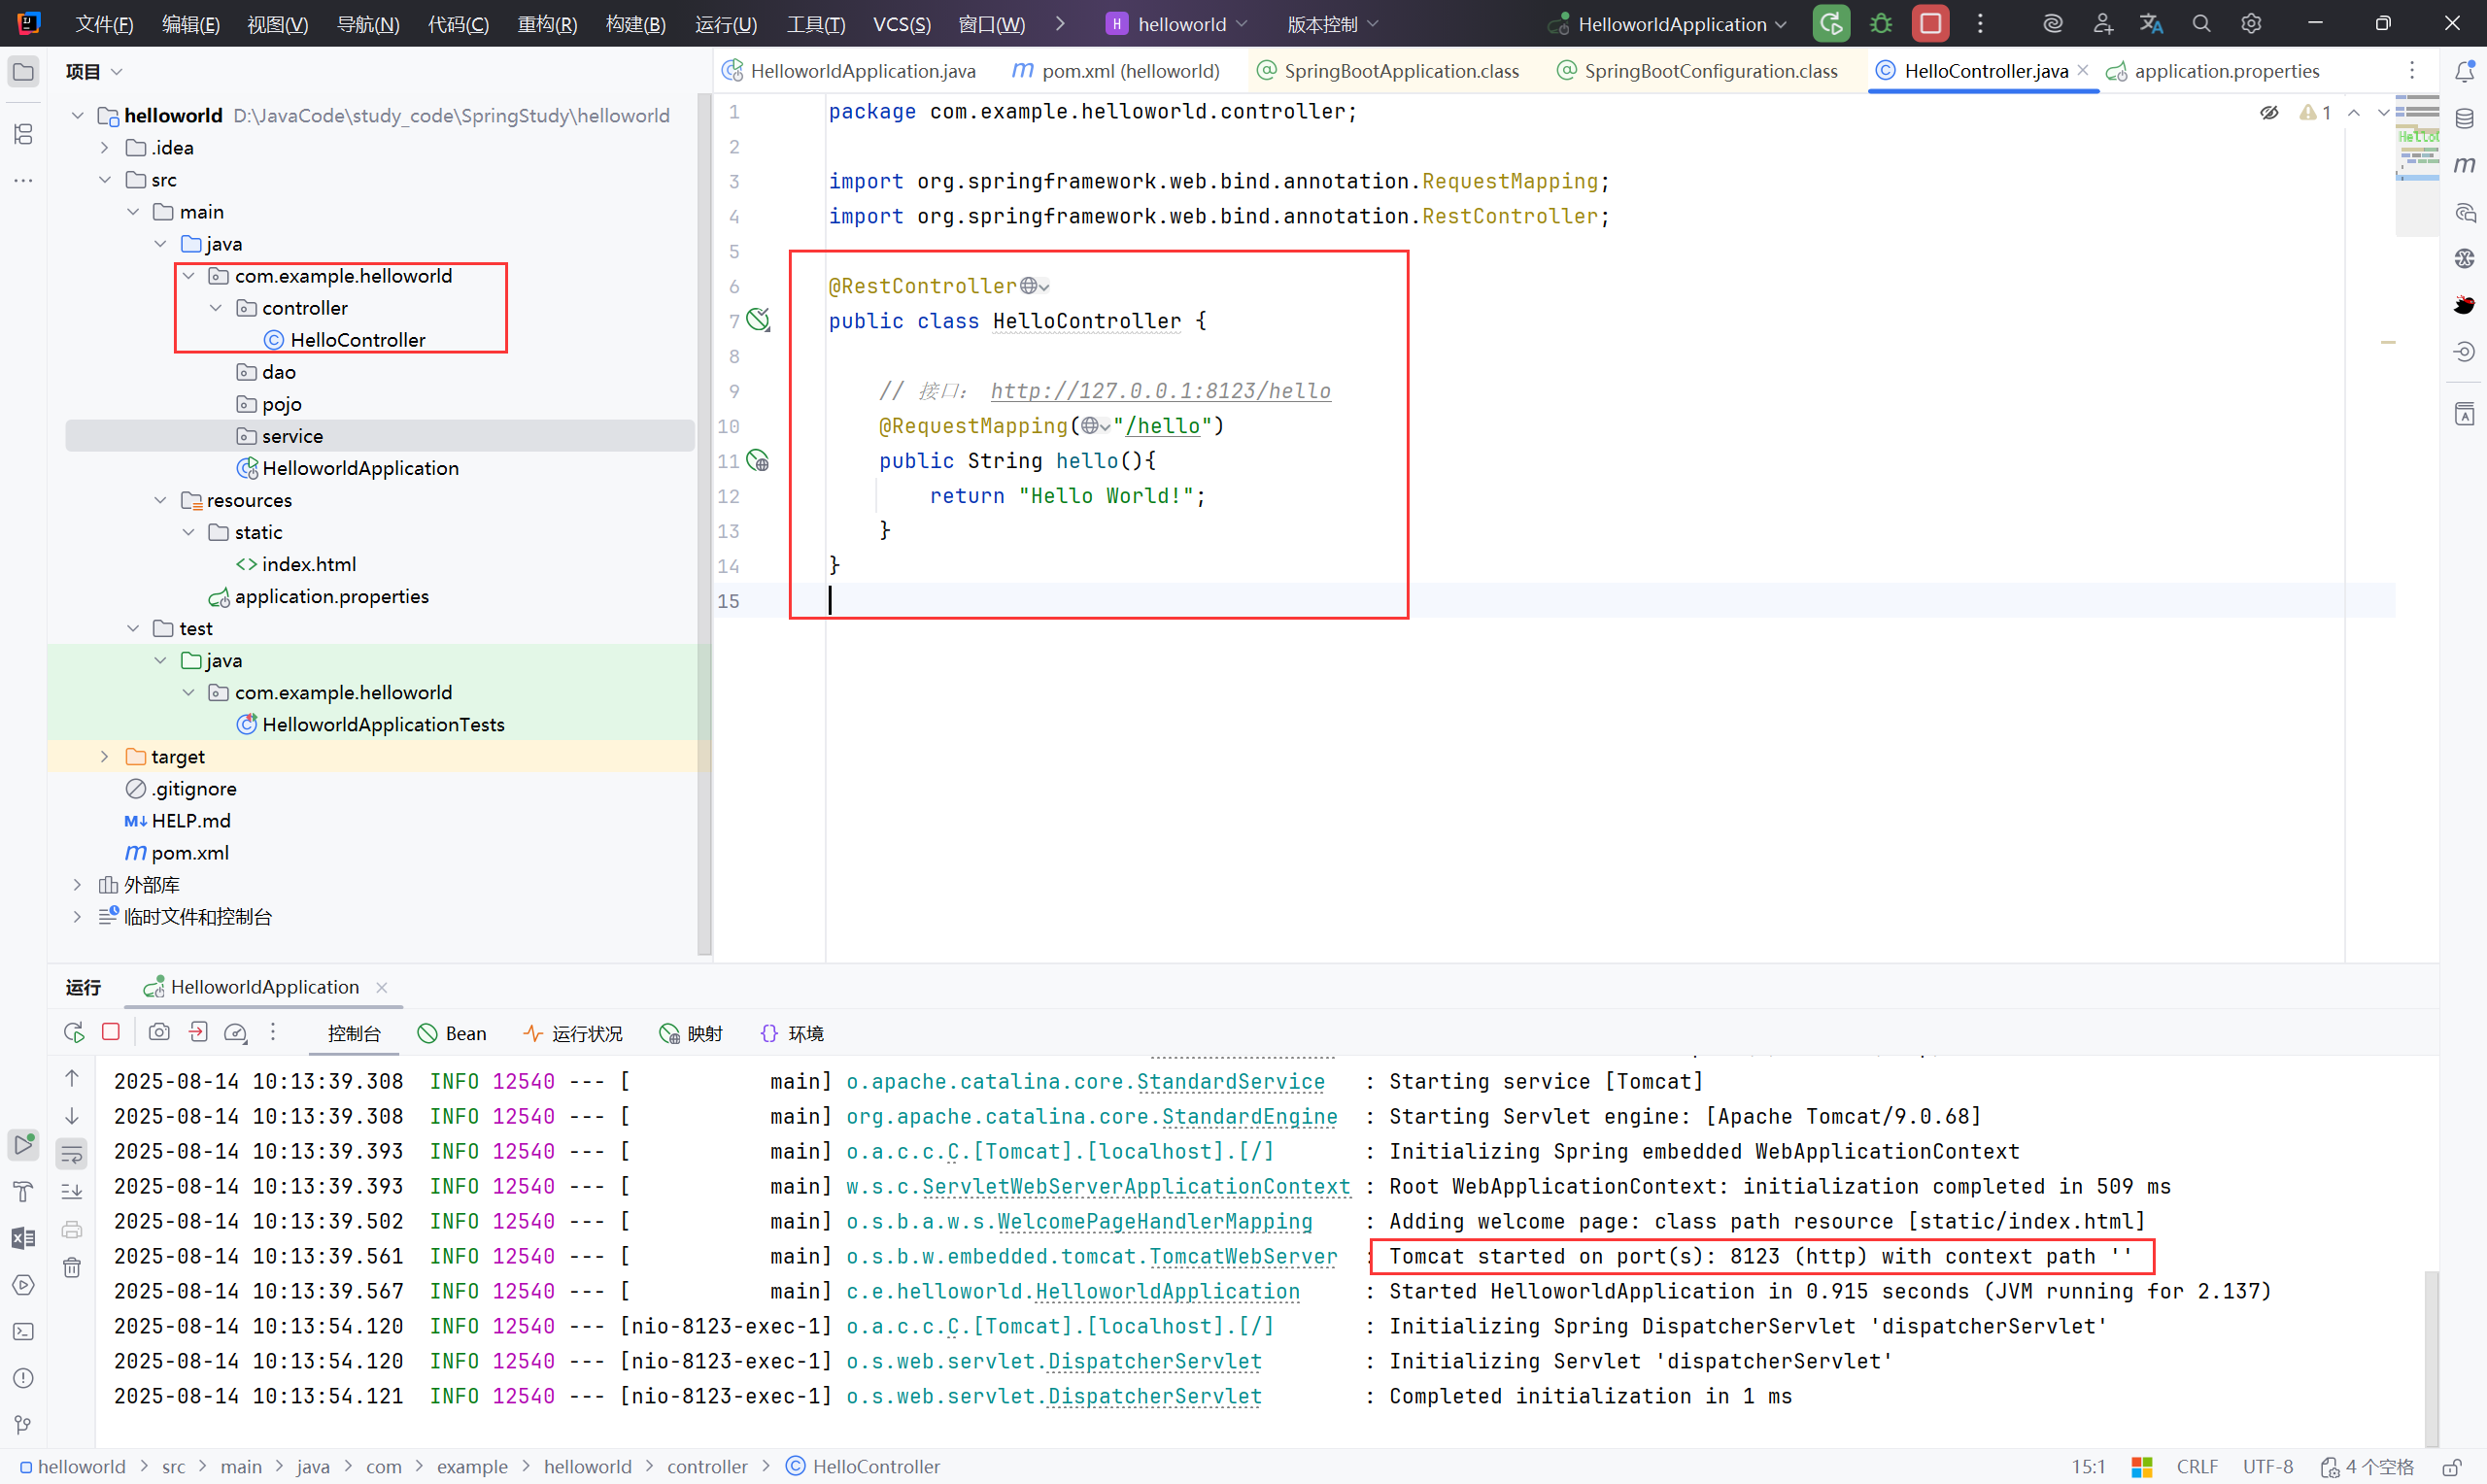
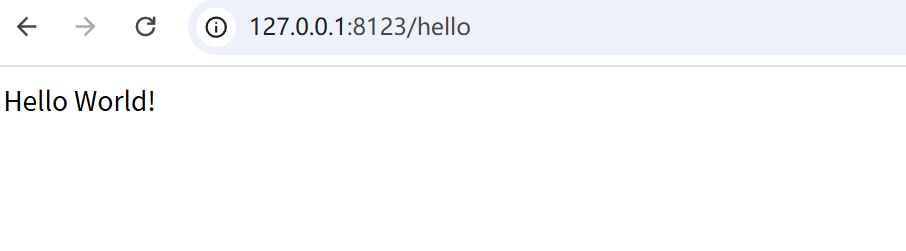
创建一个接口测试:
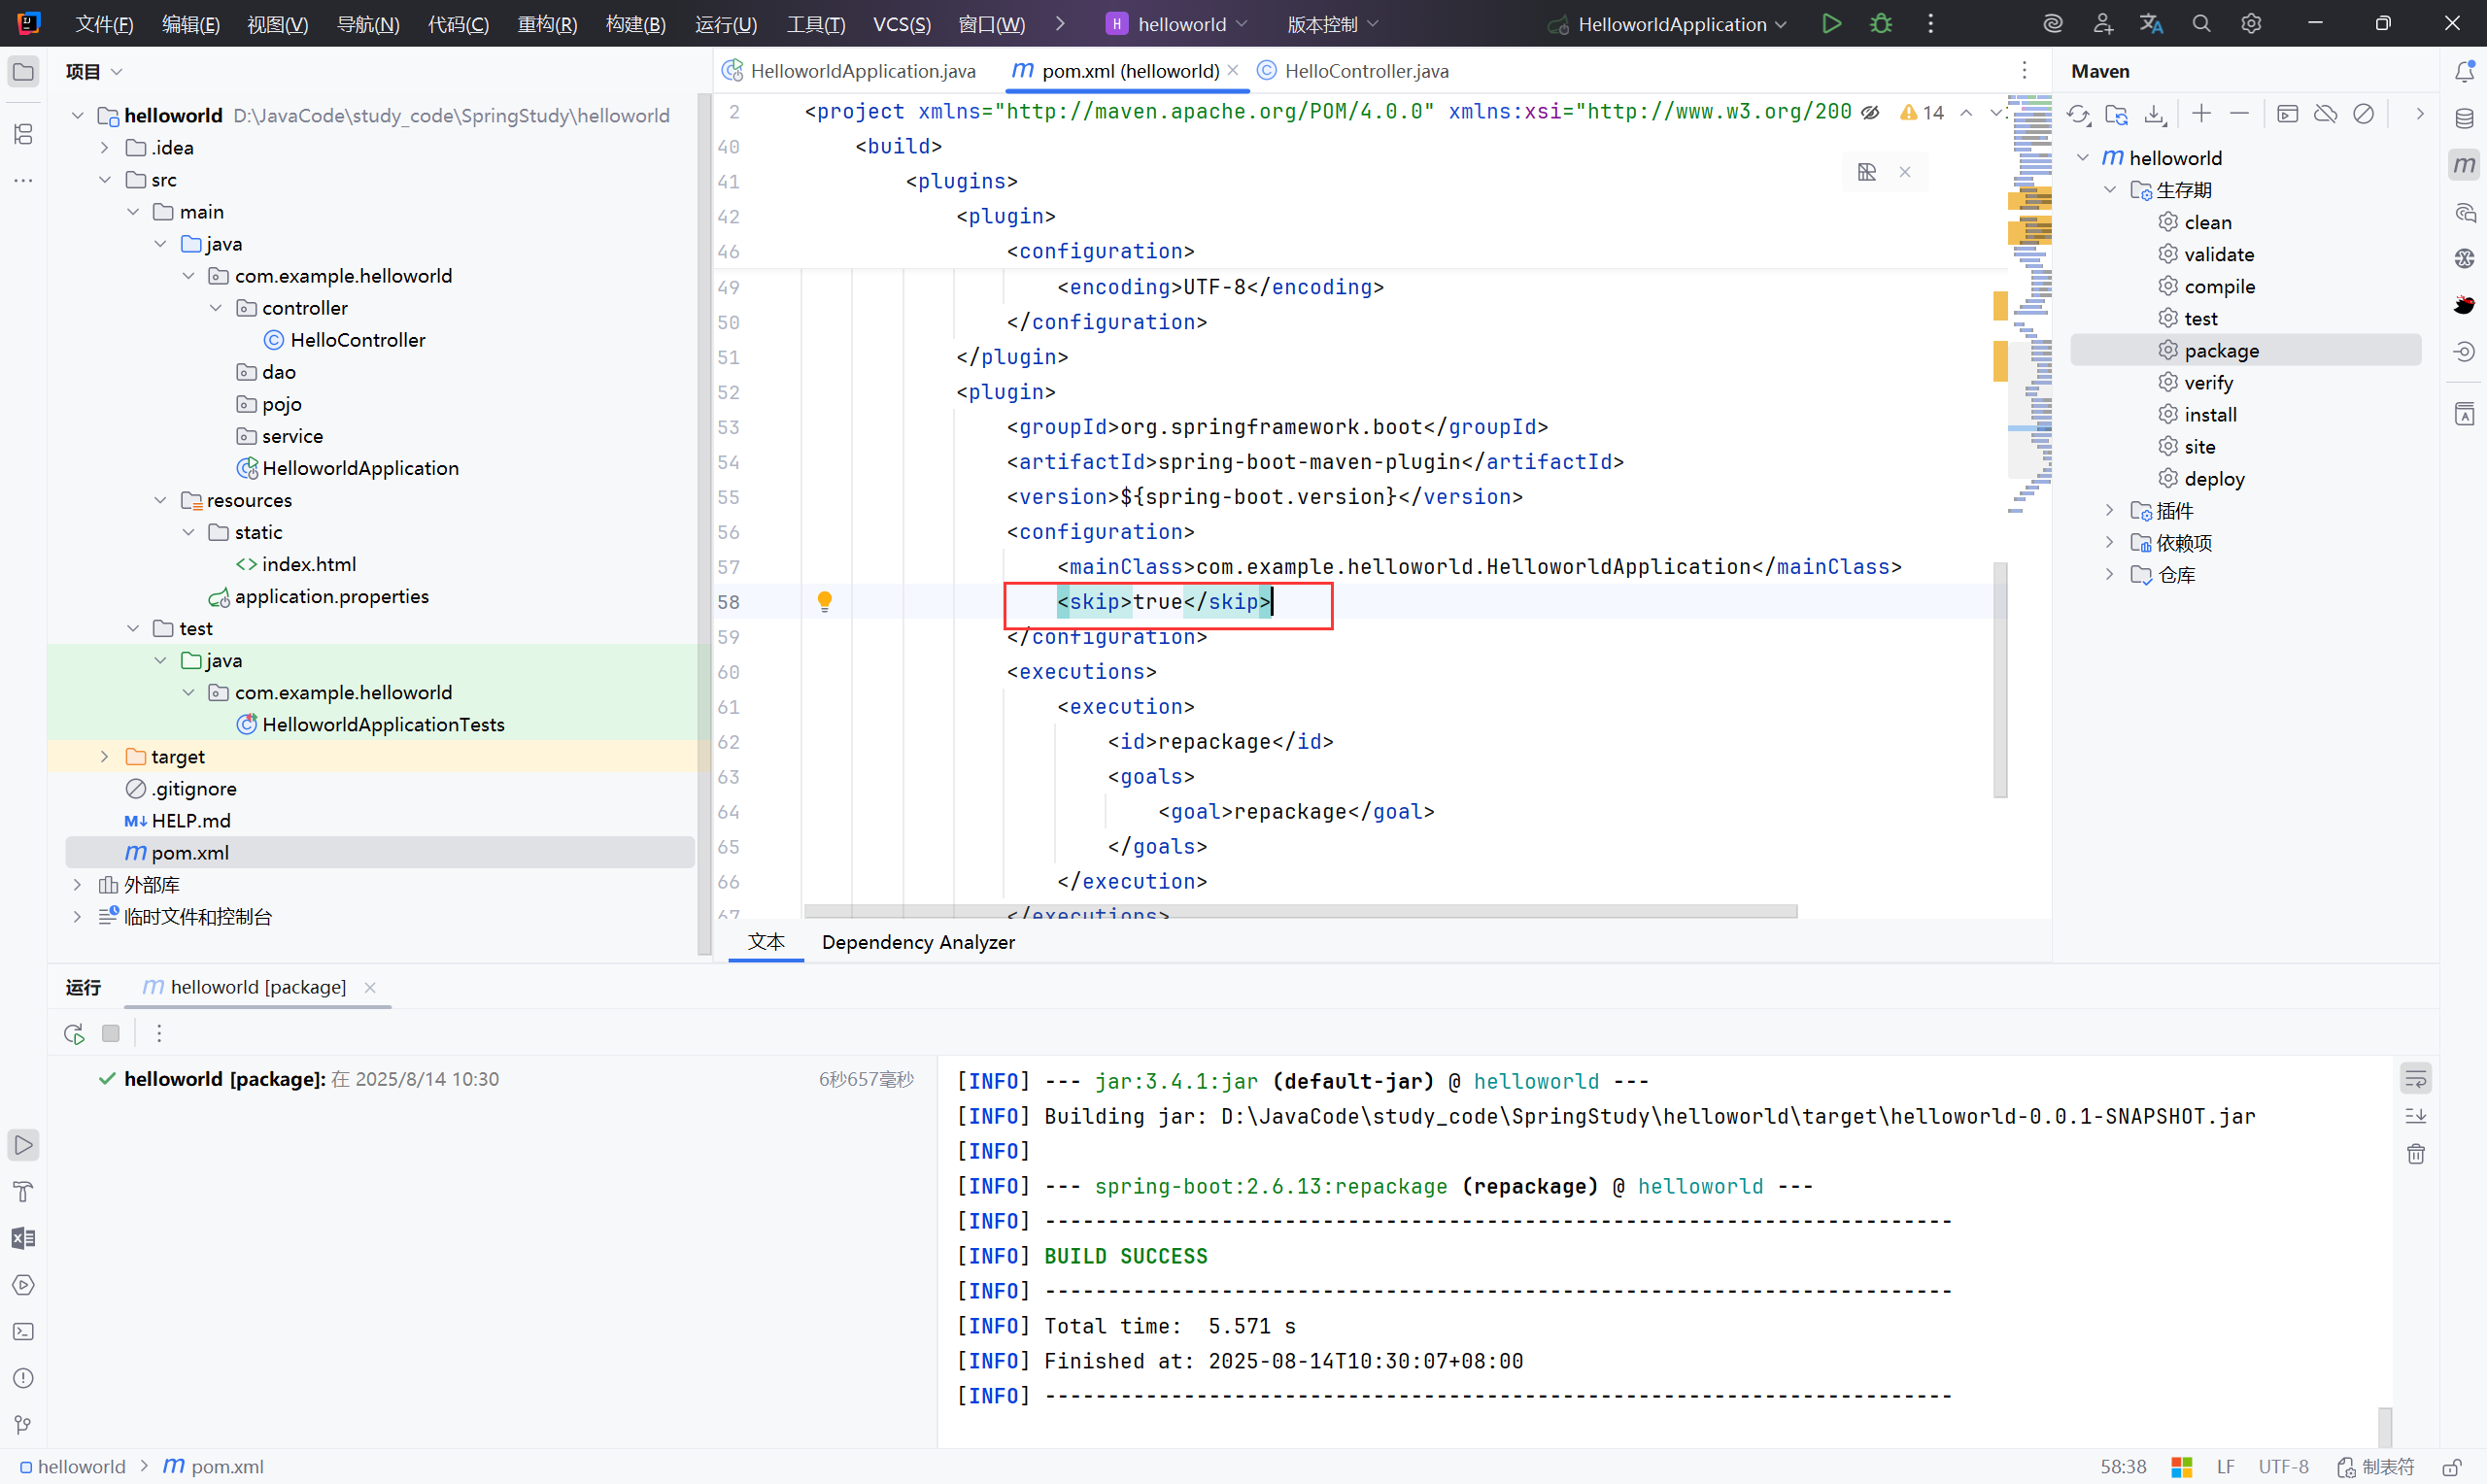
maven 打包:
注意:配置文件中的 <skip>true</skip> ,是让 spring-boot-maven-plugin 跳过执行 的,所以 Maven 打包时不会生成可运行 JAR,自然就没有Main-Class,运行时就报 “没有主清单属性”。
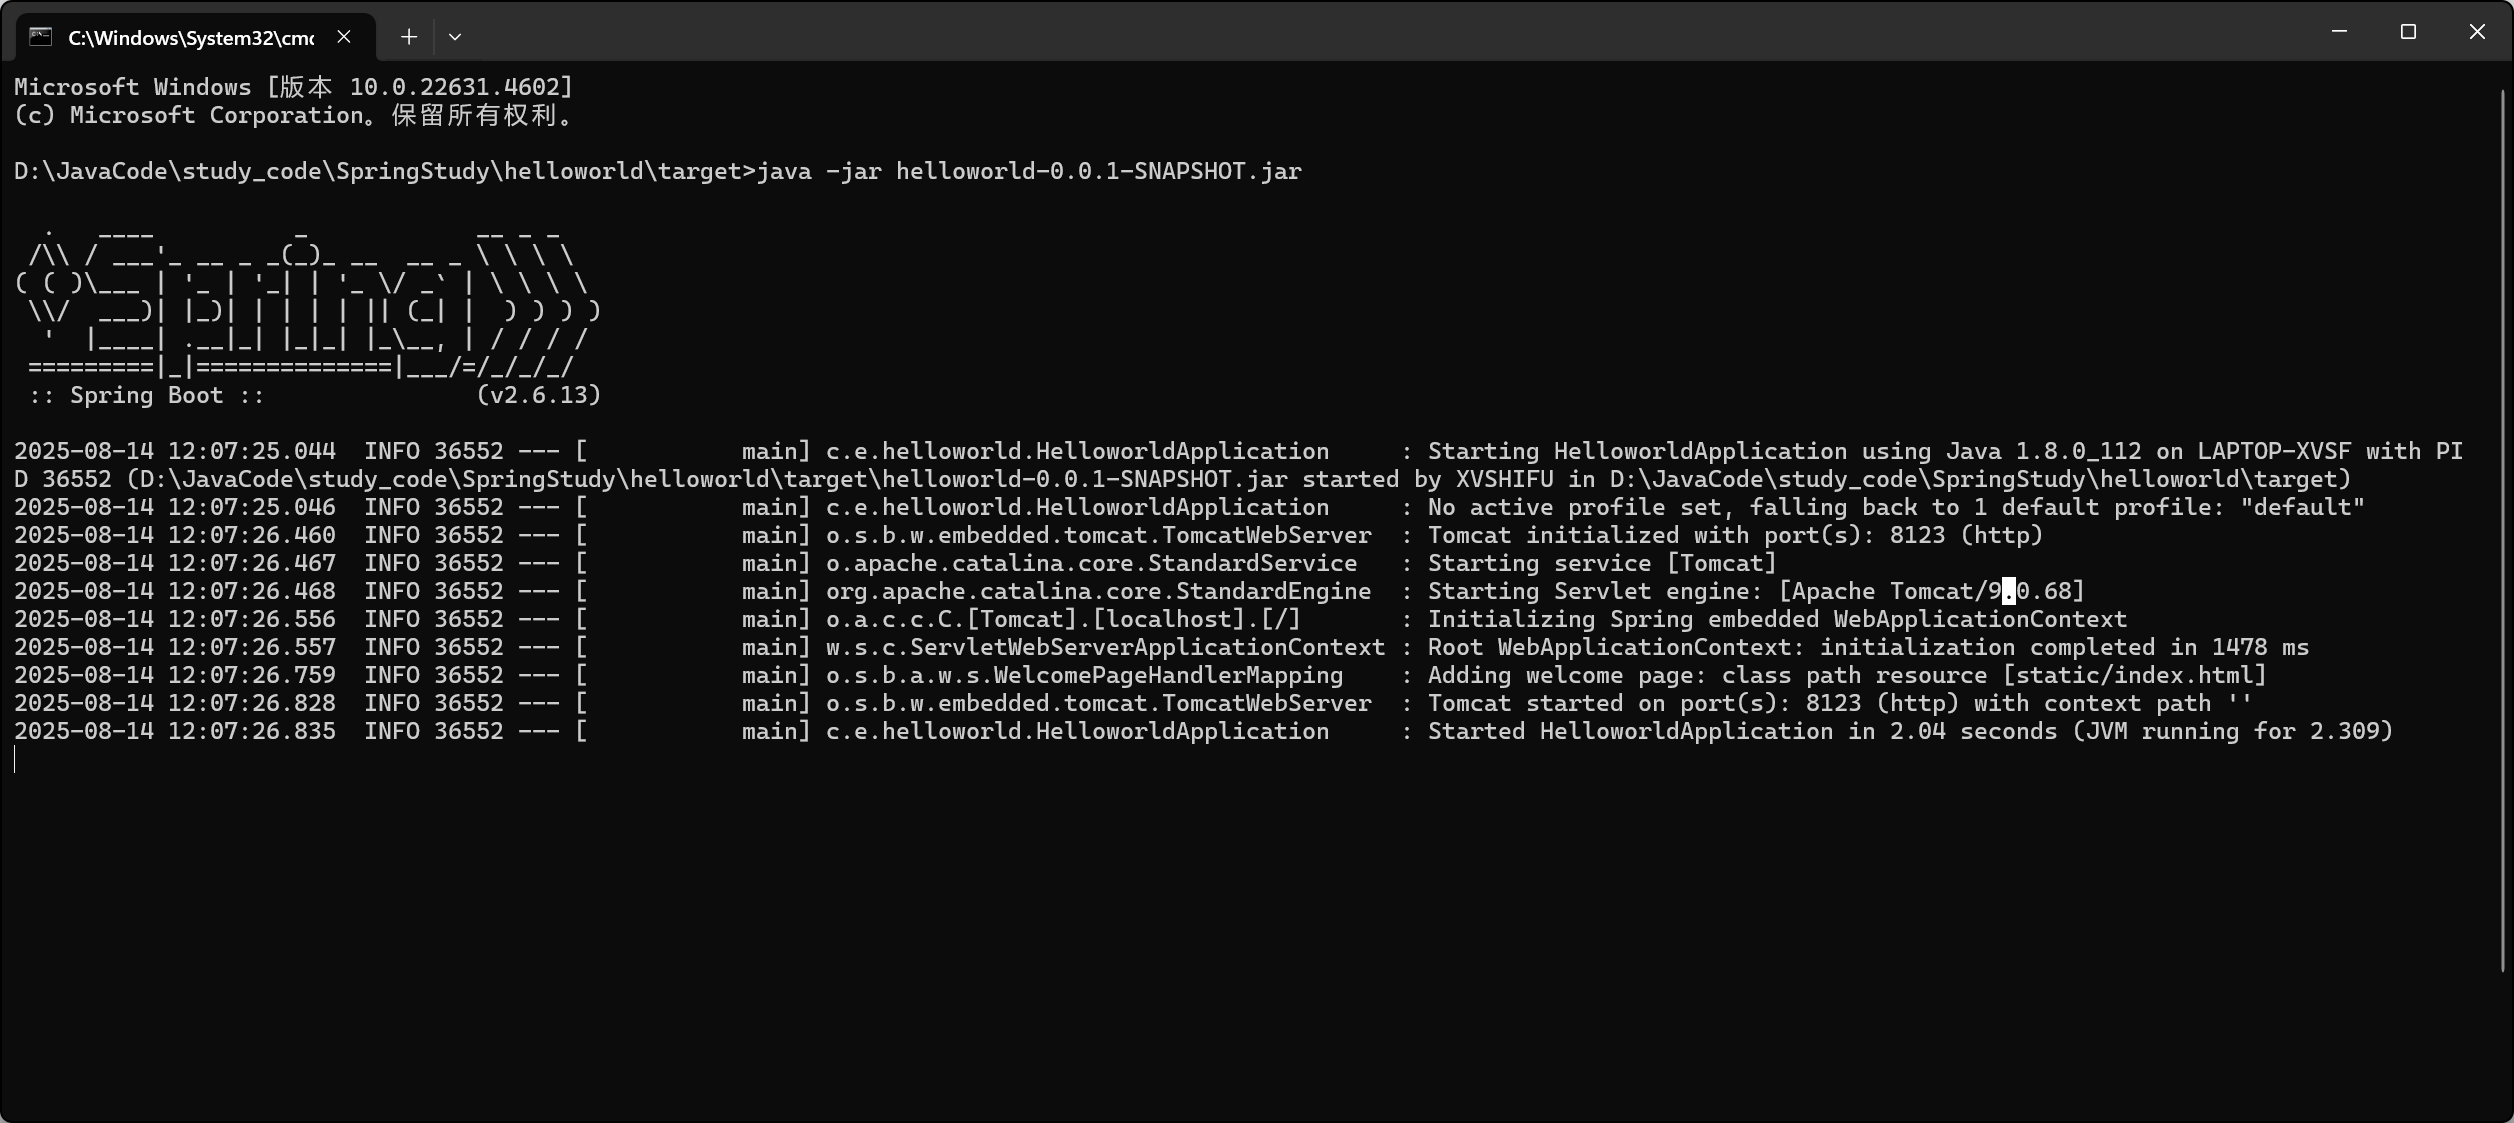
修改之后可以正常运行:
java -jar helloworld-0.0.1-SNAPSHOT.jar
2、原理#
2.1 自动配置#
2.1.1 pom.xml#
父依赖#
1
2
3
4
5
6
7
| <!-- 父依赖 -->
<parent>
<groupId>org.springframework.boot</groupId>
<artifactId>spring-boot-starter-parent</artifactId>
<version>2.6.13</version>
<relativePath/> <!-- 从远程仓库查找 -->
</parent>
|
点进去,发现还有一个父依赖
1
2
3
4
5
| <parent>
<groupId>org.springframework.boot</groupId>
<artifactId>spring-boot-dependencies</artifactId>
<version>2.6.13</version>
</parent>
|
这里才是真正管理SpringBoot应用里面所有依赖版本的地方,SpringBoot的版本控制中心;
以后我们导入依赖默认是不需要写版本;但是如果导入的包没有在依赖中管理着就需要手动配置版本了;
启动器 spring-boot-starter#
 1
 2
 3
 4
 5
 6
 7
 8
 9
10
11
12
13
| <dependencies>
<!--启动器-->
<dependency>
<groupId>org.springframework.boot</groupId>
<artifactId>spring-boot-starter-web</artifactId>
</dependency>
<dependency>
<groupId>org.springframework.boot</groupId>
<artifactId>spring-boot-starter-test</artifactId>
<scope>test</scope>
</dependency>
</dependencies>
|
springboot-boot-starter-xxx:就是spring-boot的场景启动器
spring-boot-starter-web:帮我们导入了web模块正常运行所依赖的组件;
SpringBoot将所有的功能场景都抽取出来,做成一个个的starter (启动器),只需要在项目中引入这些starter即可,所有相关的依赖都会导入进来 , 我们要用什么功能就导入什么样的场景启动器即可 ;我们未来也可以自己自定义 starter;
2.1.1 主启动类#
默认的主启动类#
 1
 2
 3
 4
 5
 6
 7
 8
 9
10
11
12
13
14
15
| package com.kuang;
import org.springframework.boot.SpringApplication;
import org.springframework.boot.autoconfigure.SpringBootApplication;
//@SpringBootApplication 来标注一个主程序类
//说明这是一个Spring Boot应用
@SpringBootApplication
public class Springboot01HelloworldApplication {
public static void main(String[] args) {
//将 springboot 应用启动
SpringApplication.run(Springboot01HelloworldApplication.class, args);
}
}
|
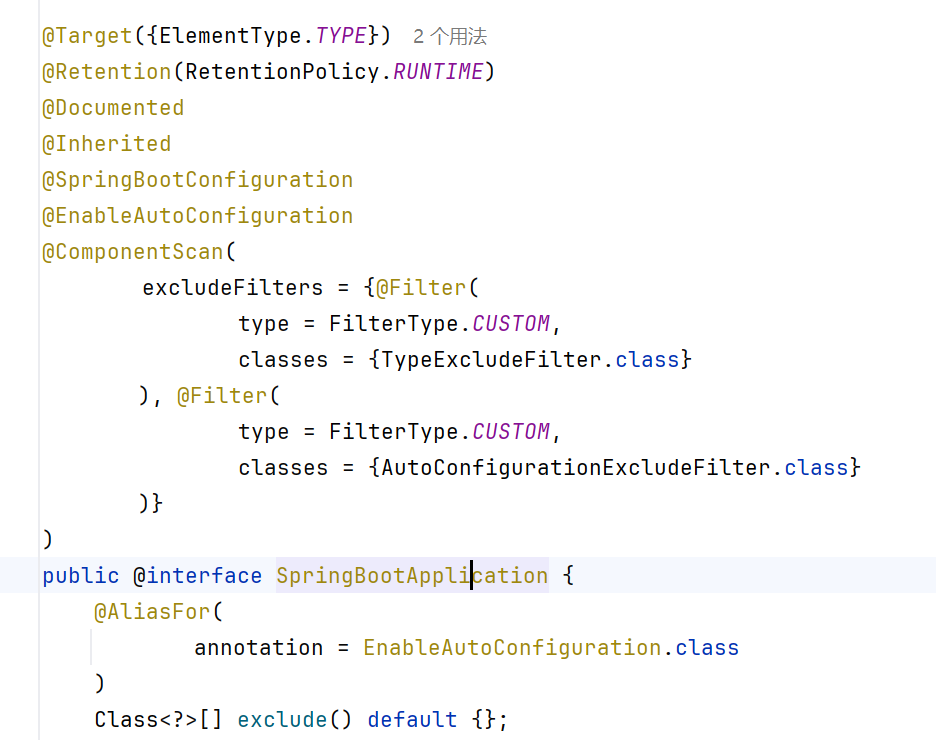
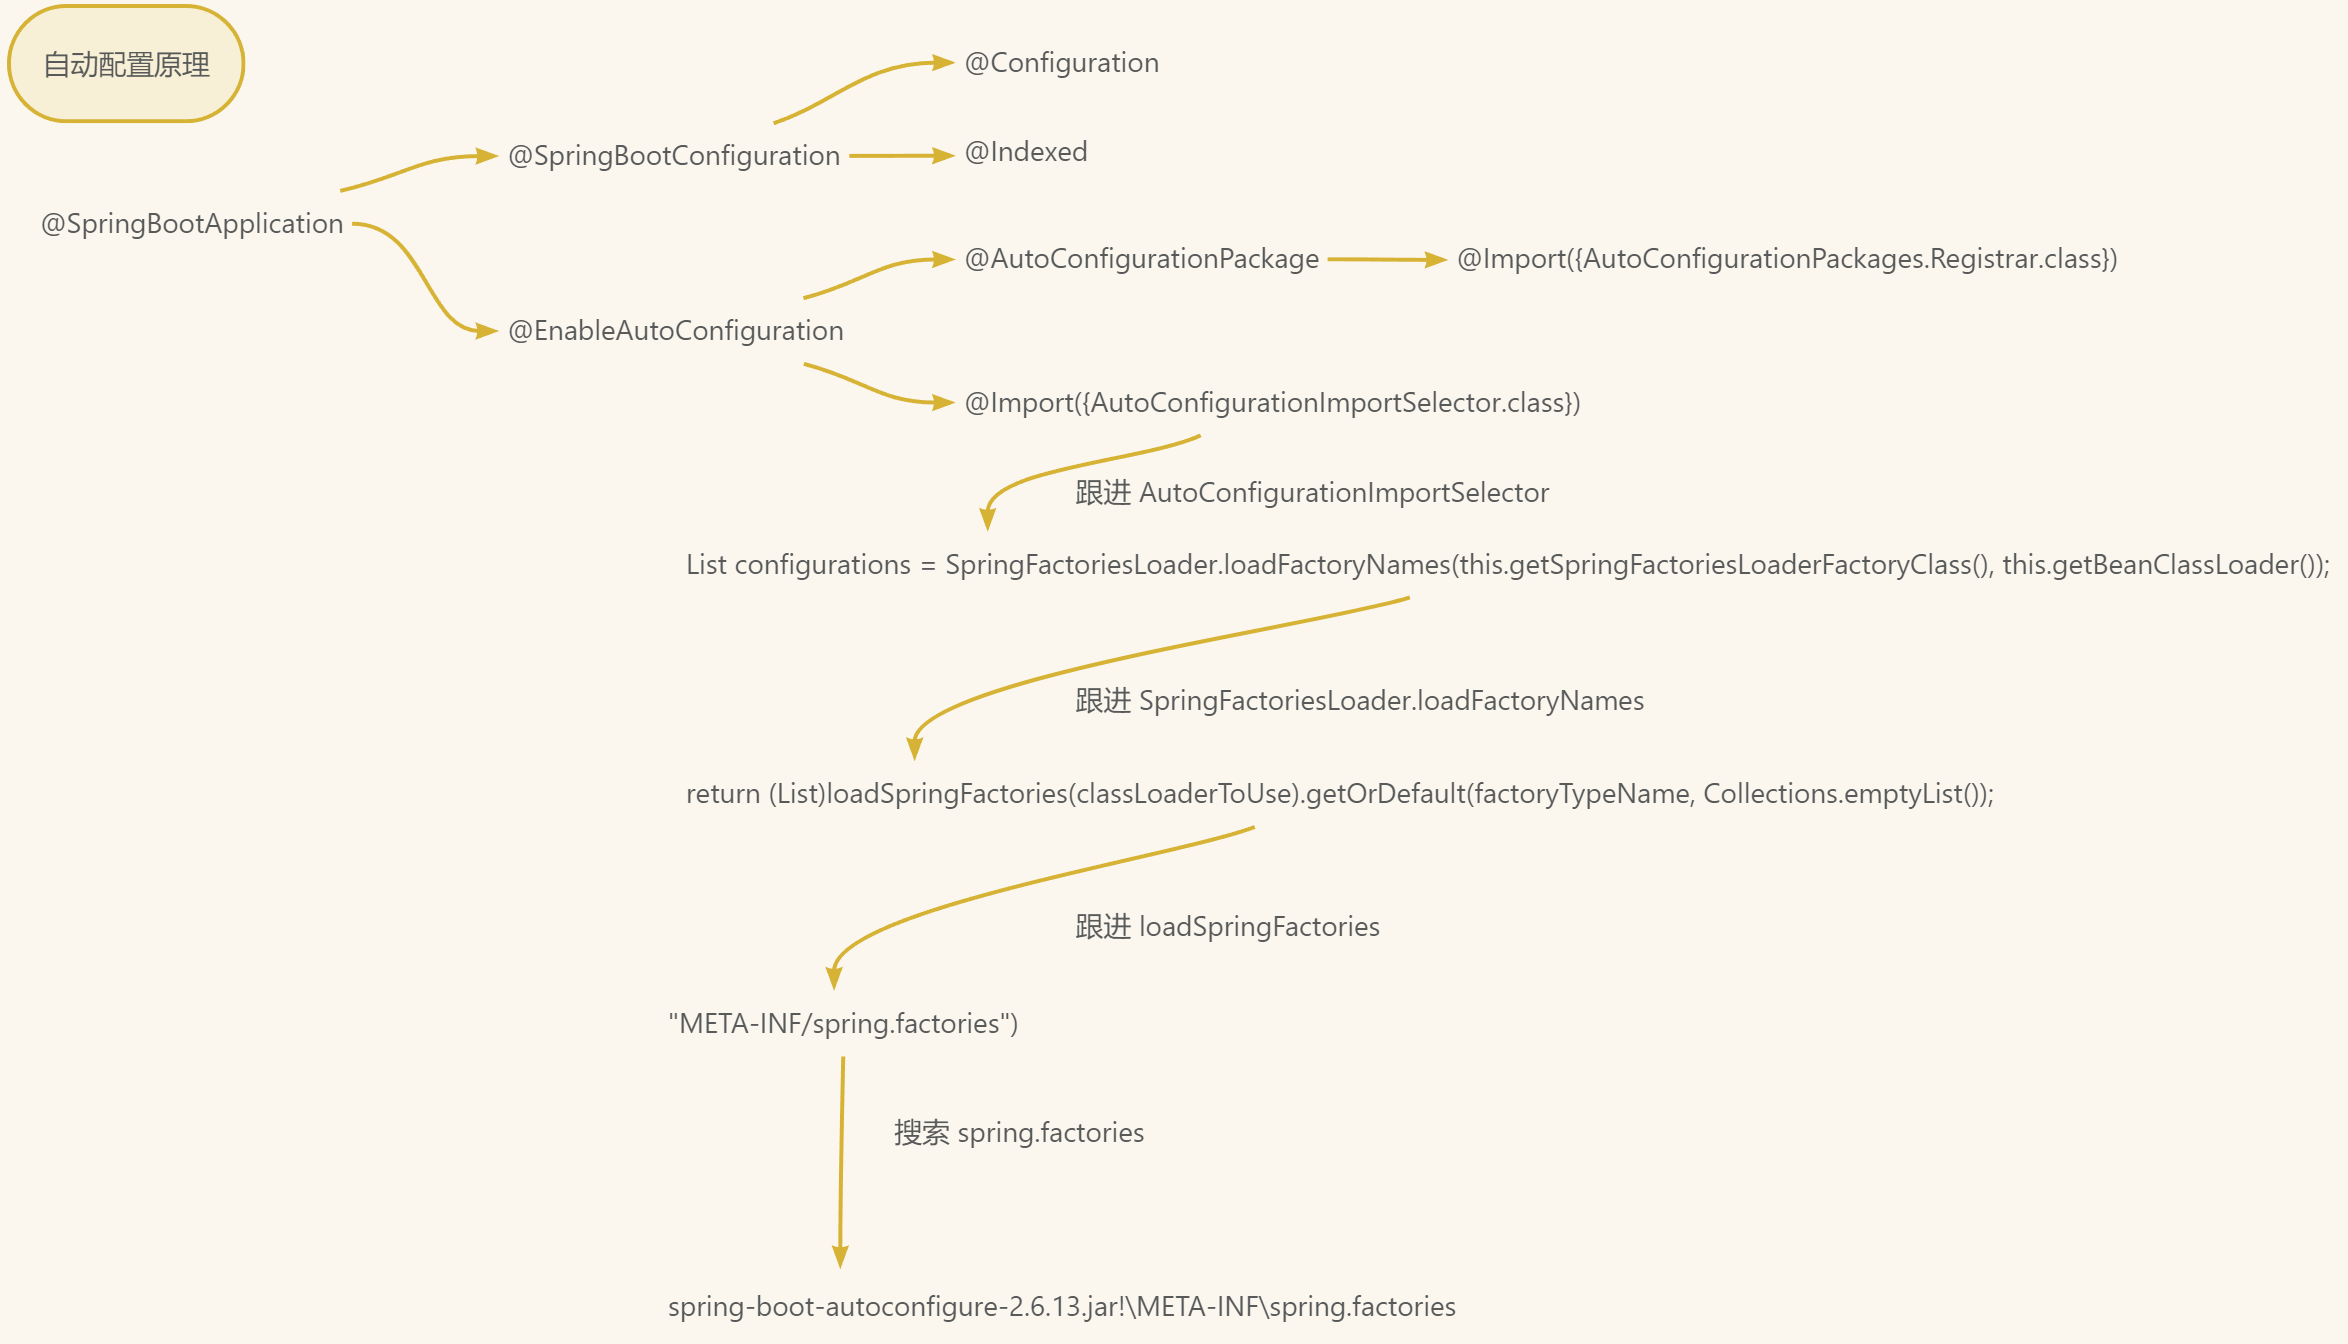
分析注解:#
@SpringBootApplication
作用:标注在某个类上说明这个类是SpringBoot的主配置类 , SpringBoot就应该运行这个类的main方法来启动SpringBoot应用;
 1
 2
 3
 4
 5
 6
 7
 8
 9
10
11
12
13
14
15
16
17
18
19
20
21
22
23
24
25
| //前四个都属于元注解
//指定这个注解可以标注的 Java 元素类型,ElementType.TYPE 表示只能标注在类、接口、枚举或注解类型上
@Target({ElementType.TYPE})
//指定注解生命周期,RUNTIME 表示注解会 保留到运行时,可以通过 反射 获取
@Retention(RetentionPolicy.RUNTIME)
//表示注解会包含在 Javadoc 文档中
@Documented
//如果一个类加了这个注解,它的子类也会自动继承该注解
@Inherited
//springboot 的配置,标记当前类是 Spring Boot 配置类,本质上是 @Configuration 的一个特化
@SpringBootConfiguration
//启用自动配置
@EnableAutoConfiguration
//启动组件扫描,会扫描当前类所在包及子包的 Spring Bean,excludeFilters:排除某些类不被扫描。
@ComponentScan(
excludeFilters = {@Filter(
type = FilterType.CUSTOM,
classes = {TypeExcludeFilter.class}
), @Filter(
type = FilterType.CUSTOM,
classes = {AutoConfigurationExcludeFilter.class}
)}
)
|
 1
 2
 3
 4
 5
 6
 7
 8
 9
10
11
12
13
14
15
| @Target({ElementType.TYPE})
@Retention(RetentionPolicy.RUNTIME)
@Documented
//Spring 注解
//表示当前类是一个 Spring 配置类
@Configuration
//Spring 在编译时会生成索引文件,用于快速扫描注解类,提高启动性能
@Indexed
public @interface SpringBootConfiguration {
@AliasFor(
annotation = Configuration.class
)
boolean proxyBeanMethods() default true;
}
|
 1
 2
 3
 4
 5
 6
 7
 8
 9
10
11
12
13
14
15
| @Target({ElementType.TYPE})
@Retention(RetentionPolicy.RUNTIME)
@Documented
@Inherited
//自动配置包
@AutoConfigurationPackage
//给容器导入组件
@Import({AutoConfigurationImportSelector.class})
public @interface EnableAutoConfiguration {
String ENABLED_OVERRIDE_PROPERTY = "spring.boot.enableautoconfiguration";
Class<?>[] exclude() default {};
String[] excludeName() default {};
}
|
 1
 2
 3
 4
 5
 6
 7
 8
 9
10
11
| @Target({ElementType.TYPE})
@Retention(RetentionPolicy.RUNTIME)
@Documented
@Inherited
//Spring底层注解@import , 给容器中导入一个组件,Registrar.class 作用:将主启动类的所在包及包下面所有子包里面的所有组件扫描到Spring容器 ;
@Import({AutoConfigurationPackages.Registrar.class})
public @interface AutoConfigurationPackage {
String[] basePackages() default {};
Class<?>[] basePackageClasses() default {};
}
|
跟进 @Import({AutoConfigurationImportSelector.class})
 1
 2
 3
 4
 5
 6
 7
 8
 9
10
11
12
13
14
15
16
17
18
19
20
21
22
23
24
25
26
27
28
29
30
31
32
33
34
35
36
37
38
39
40
41
42
43
44
45
46
47
48
49
50
51
52
53
54
55
56
57
58
59
60
61
62
63
64
65
66
67
| @Import({AutoConfigurationImportSelector.class})
->AutoConfigurationImportSelector
public class AutoConfigurationImportSelector implements DeferredImportSelector, BeanClassLoaderAware, ResourceLoaderAware, BeanFactoryAware, EnvironmentAware, Ordered {
...
//获取所有候选的自动配置类;AnnotationMetadata metadata:标注了 @EnableAutoConfiguration 或 @SpringBootApplication 的类的注解信息;AnnotationAttributes attributes:注解的属性集合,比如 exclude、excludeName 等
protected List<String> getCandidateConfigurations(AnnotationMetadata metadata, AnnotationAttributes attributes) {
//通过 SpringFactoriesLoader 从 META-INF/spring.factories 文件中加载自动配置类名
List<String> configurations = SpringFactoriesLoader.loadFactoryNames(this.getSpringFactoriesLoaderFactoryClass(), this.getBeanClassLoader());
//configurations 不为空,如果为空,抛出异常提示
Assert.notEmpty(configurations, "No auto configuration classes found in META-INF/spring.factories. If you are using a custom packaging, make sure that file is correct.");
//返回启动自动导入配置文件的注解类;EnableAutoConfiguration
return configurations;
}
->SpringFactoriesLoader.loadFactoryNames
public final class SpringFactoriesLoader {
public static List<String> loadFactoryNames(Class<?> factoryType, @Nullable ClassLoader classLoader) {
ClassLoader classLoaderToUse = classLoader;
if (classLoader == null) {
classLoaderToUse = SpringFactoriesLoader.class.getClassLoader();
}
String factoryTypeName = factoryType.getName();
//调用了 loadSpringFactories 方法
return (List)loadSpringFactories(classLoaderToUse).getOrDefault(factoryTypeName, Collections.emptyList());
}
->loadSpringFactories
private static Map<String, List<String>> loadSpringFactories(ClassLoader classLoader) {
//cache 是静态缓存,避免每次都扫描文件。如果缓存存在,直接返回,提升性能
Map<String, List<String>> result = (Map)cache.get(classLoader);
if (result != null) {
return result;
} else {
result = new HashMap();
try {
//扫描 META-INF/spring.factories
Enumeration<URL> urls = classLoader.getResources("META-INF/spring.factories");
//将每个 spring.factories 文件包装成 UrlResource。使用 PropertiesLoaderUtils 加载为 Properties 对象,key=value 的形式
while(urls.hasMoreElements()) {
URL url = (URL)urls.nextElement();
UrlResource resource = new UrlResource(url);
Properties properties = PropertiesLoaderUtils.loadProperties(resource);
//遍历文件中的每个条目,把实现类加入列表
for(Map.Entry<?, ?> entry : properties.entrySet()) {
String factoryTypeName = ((String)entry.getKey()).trim();
String[] factoryImplementationNames = StringUtils.commaDelimitedListToStringArray((String)entry.getValue());
for(String factoryImplementationName : factoryImplementationNames) {
((List)result.computeIfAbsent(factoryTypeName, (key) -> new ArrayList())).add(factoryImplementationName.trim());
}
}
}
//去重 distinct(),转为 不可修改列表(unmodifiableList)
result.replaceAll((factoryType, implementations) -> (List)implementations.stream().distinct().collect(Collectors.collectingAndThen(Collectors.toList(), Collections::unmodifiableList)));
//缓存结果并返回
cache.put(classLoader, result);
return result;
} catch (IOException ex) {
//读取文件出错时,抛出 IllegalArgumentException 异常
throw new IllegalArgumentException("Unable to load factories from location [META-INF/spring.factories]", ex);
}
}
}
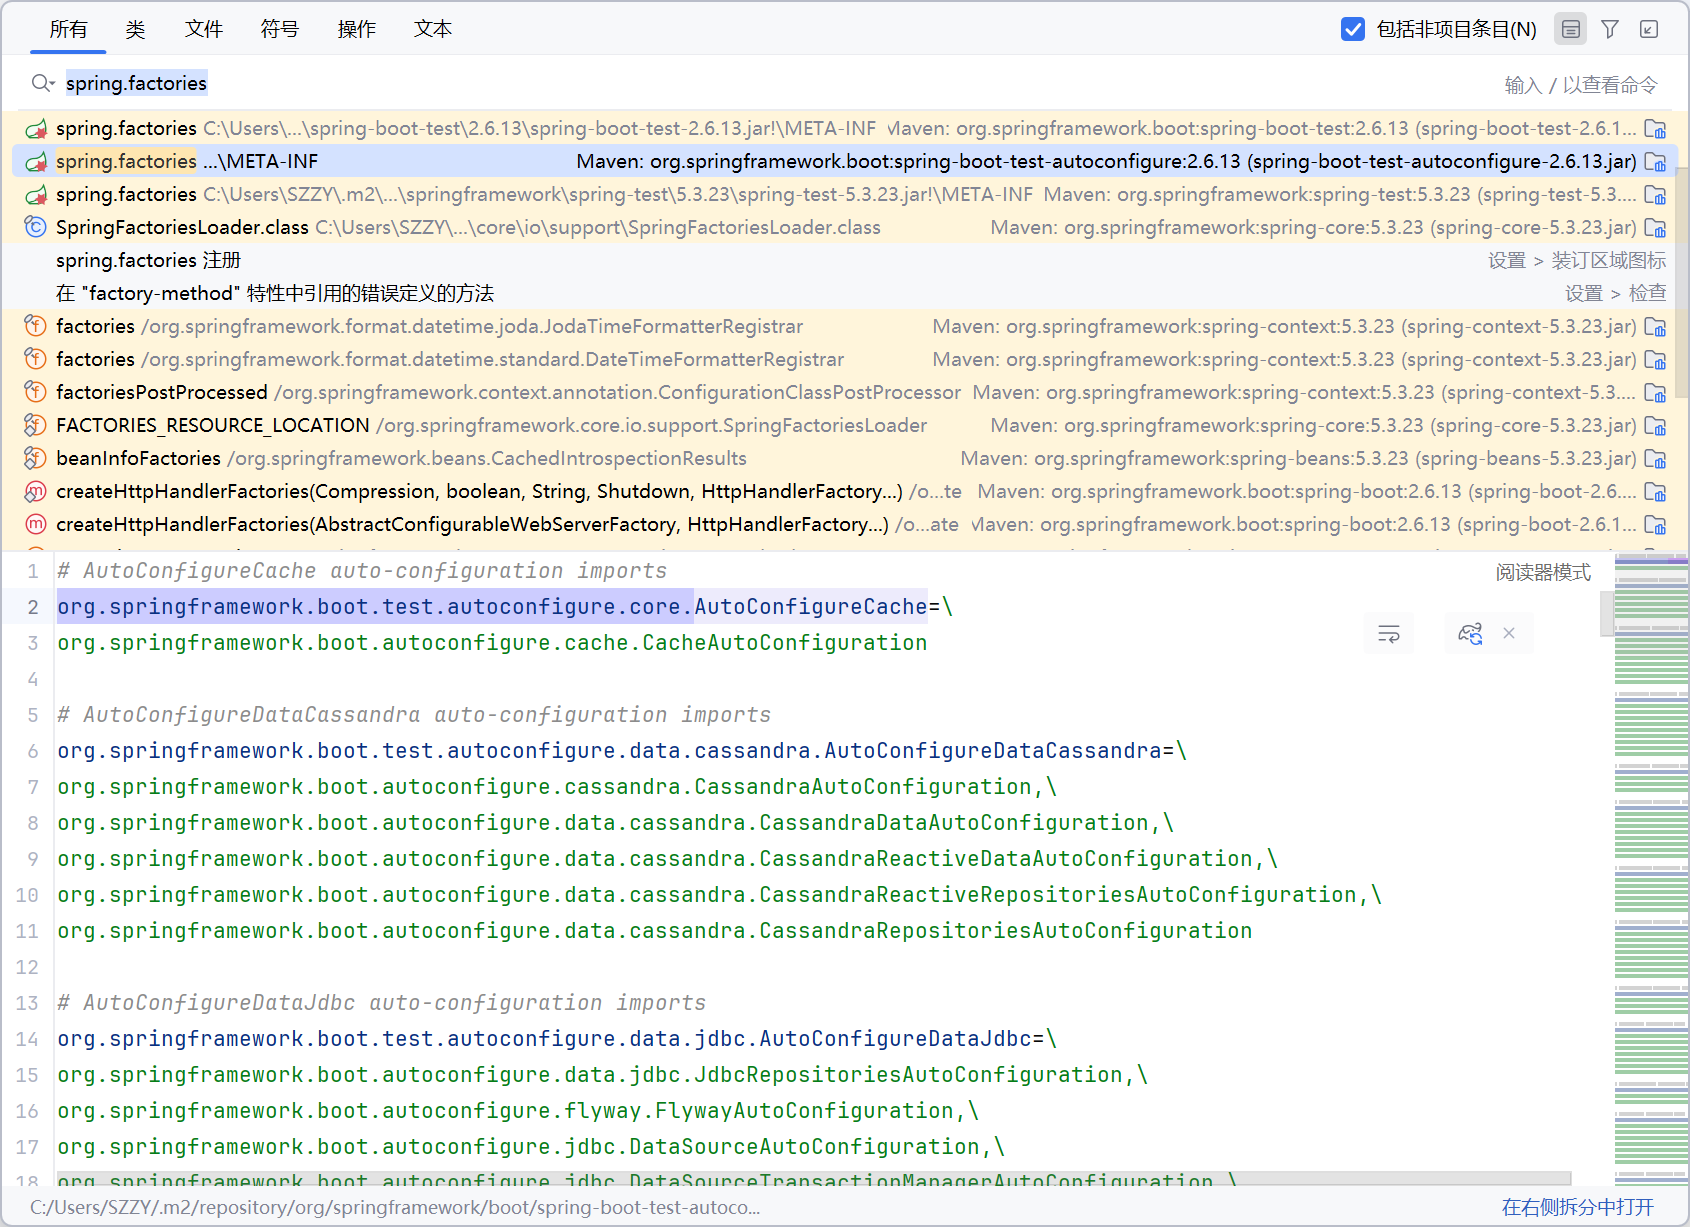
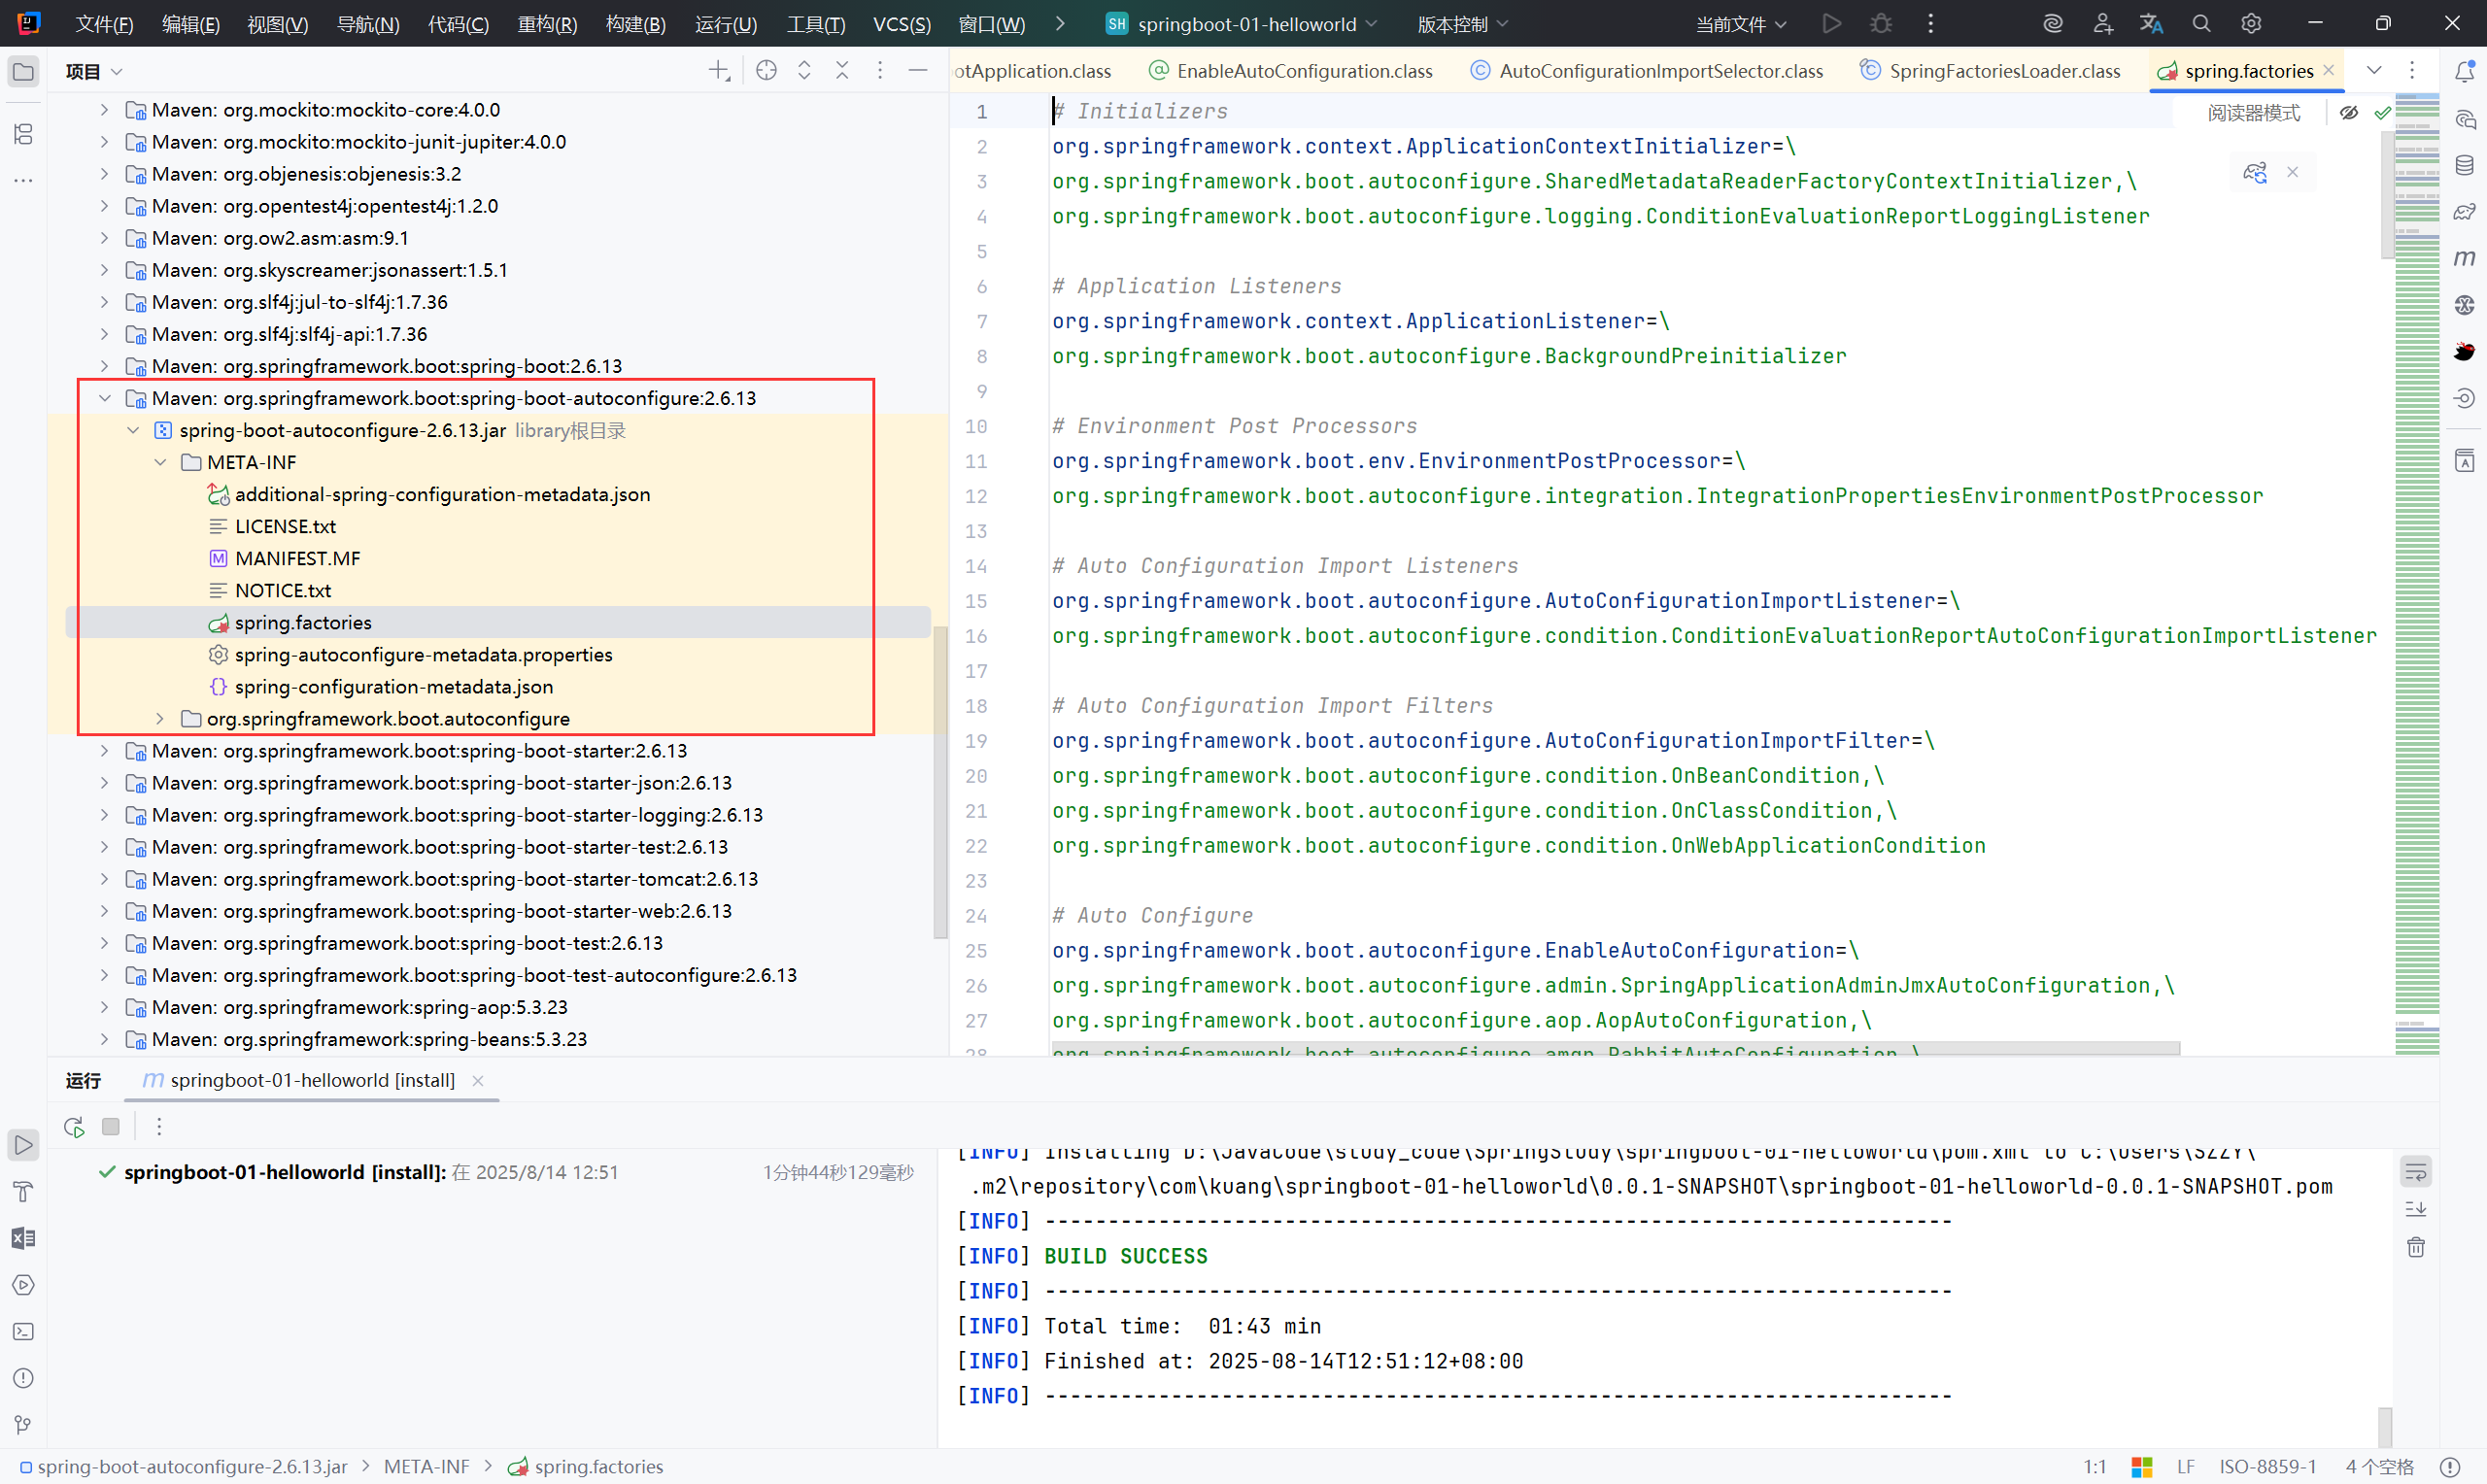
->spring.factories (既然是对此文件做改动,那么全局搜索此文件)
|
查看后发现都是自动配置文件,这就是自动配置的根源
小结:#
SpringBoot在启动的时候从类路径下的 META-INF/spring.factories(spring-boot-autoconfigure-2.6.13.jar!\META-INF\spring.factories)中获取 EnableAutoConfiguration 指定的自动配置值
SpringApplication#
这个类主要做了以下四件事情:
1、推断应用的类型是普通的项目还是Web项目
2、查找并加载所有可用初始化器 , 设置到initializers属性中
3、找出所有的应用程序监听器,设置到listeners属性中
4、推断并设置main方法的定义类,找到运行的主类
1
| SpringApplication.run(Springboot01HelloworldApplication.class, args);
|
3、SpringBoot 配置#
SpringBoot使用一个全局的配置文件 , 配置文件名称是固定的
- application.properties
- application.yml
配置文件的作用 :修改SpringBoot自动配置的默认值,因为SpringBoot在底层都给我们自动配置好了;
yaml概述#
YAML 语言教程 - 阮一峰的网络日志
yaml 语法#
 1
 2
 3
 4
 5
 6
 7
 8
 9
10
11
12
13
14
15
16
17
| # 普通的 key-value
name: qwe
# 对象
student:
name: qwe
age: 11
student: {name: qwe, age: 1}
# 数组
pets:
- cat
- dog
- pig
pets: [cat,dog,pig]
|
yaml注入配置文件#
**@ConfigurationProperties **作用:将配置文件中配置的每一个属性的值,映射到这个组件中;告诉 SpringBoot 将本类中的所有属性和配置文件中相关的配置进行绑定参数 prefix = “person” : 将配置文件中的person下面的所有属性一一对应
 1
 2
 3
 4
 5
 6
 7
 8
 9
10
11
12
13
14
15
16
17
18
19
20
21
22
23
24
25
26
27
28
29
30
31
32
33
34
35
36
37
38
39
40
41
42
43
44
45
46
47
48
49
50
51
52
53
54
55
56
57
58
59
60
61
62
63
64
65
66
67
68
69
70
71
72
73
74
75
76
77
78
79
80
81
82
83
84
85
86
87
88
89
90
91
92
93
94
95
96
97
98
99
| package com.kuang.pojo;
import org.springframework.boot.context.properties.ConfigurationProperties;
import org.springframework.stereotype.Component;
import java.util.*;
@Component
@ConfigurationProperties(prefix = "person")
public class Person {
private String name;
private int age;
private Boolean happy;
private Date birth;
private Map<String,Object> maps;
private List<Object> lists;
private Dog dog;
public Person() {}
public Person(String name, int age, Date birth, Boolean happy, List<Object> lists, Map<String, Object> maps, Dog dog) {
this.name = name;
this.age = age;
this.birth = birth;
this.happy = happy;
this.lists = lists;
this.maps = maps;
this.dog = dog;
}
public String getName() {
return name;
}
public void setName(String name) {
this.name = name;
}
public int getAge() {
return age;
}
public void setAge(int age) {
this.age = age;
}
public Boolean getHappy() {
return happy;
}
public void setHappy(Boolean happy) {
this.happy = happy;
}
public Date getBirth() {
return birth;
}
public void setBirth(Date birth) {
this.birth = birth;
}
public Map<String, Object> getMaps() {
return maps;
}
public void setMaps(Map<String, Object> maps) {
this.maps = maps;
}
public List<Object> getLists() {
return lists;
}
public void setLists(List<Object> lists) {
this.lists = lists;
}
public Dog getDog() {
return dog;
}
public void setDog(Dog dog) {
this.dog = dog;
}
@Override
public String toString() {
return "Person{" +
"name='" + name + '\'' +
", age=" + age +
", happy=" + happy +
", birth=" + birth +
", maps=" + maps +
", lists=" + lists +
", dog=" + dog +
'}';
}
}
|
 1
 2
 3
 4
 5
 6
 7
 8
 9
10
11
12
13
14
15
16
17
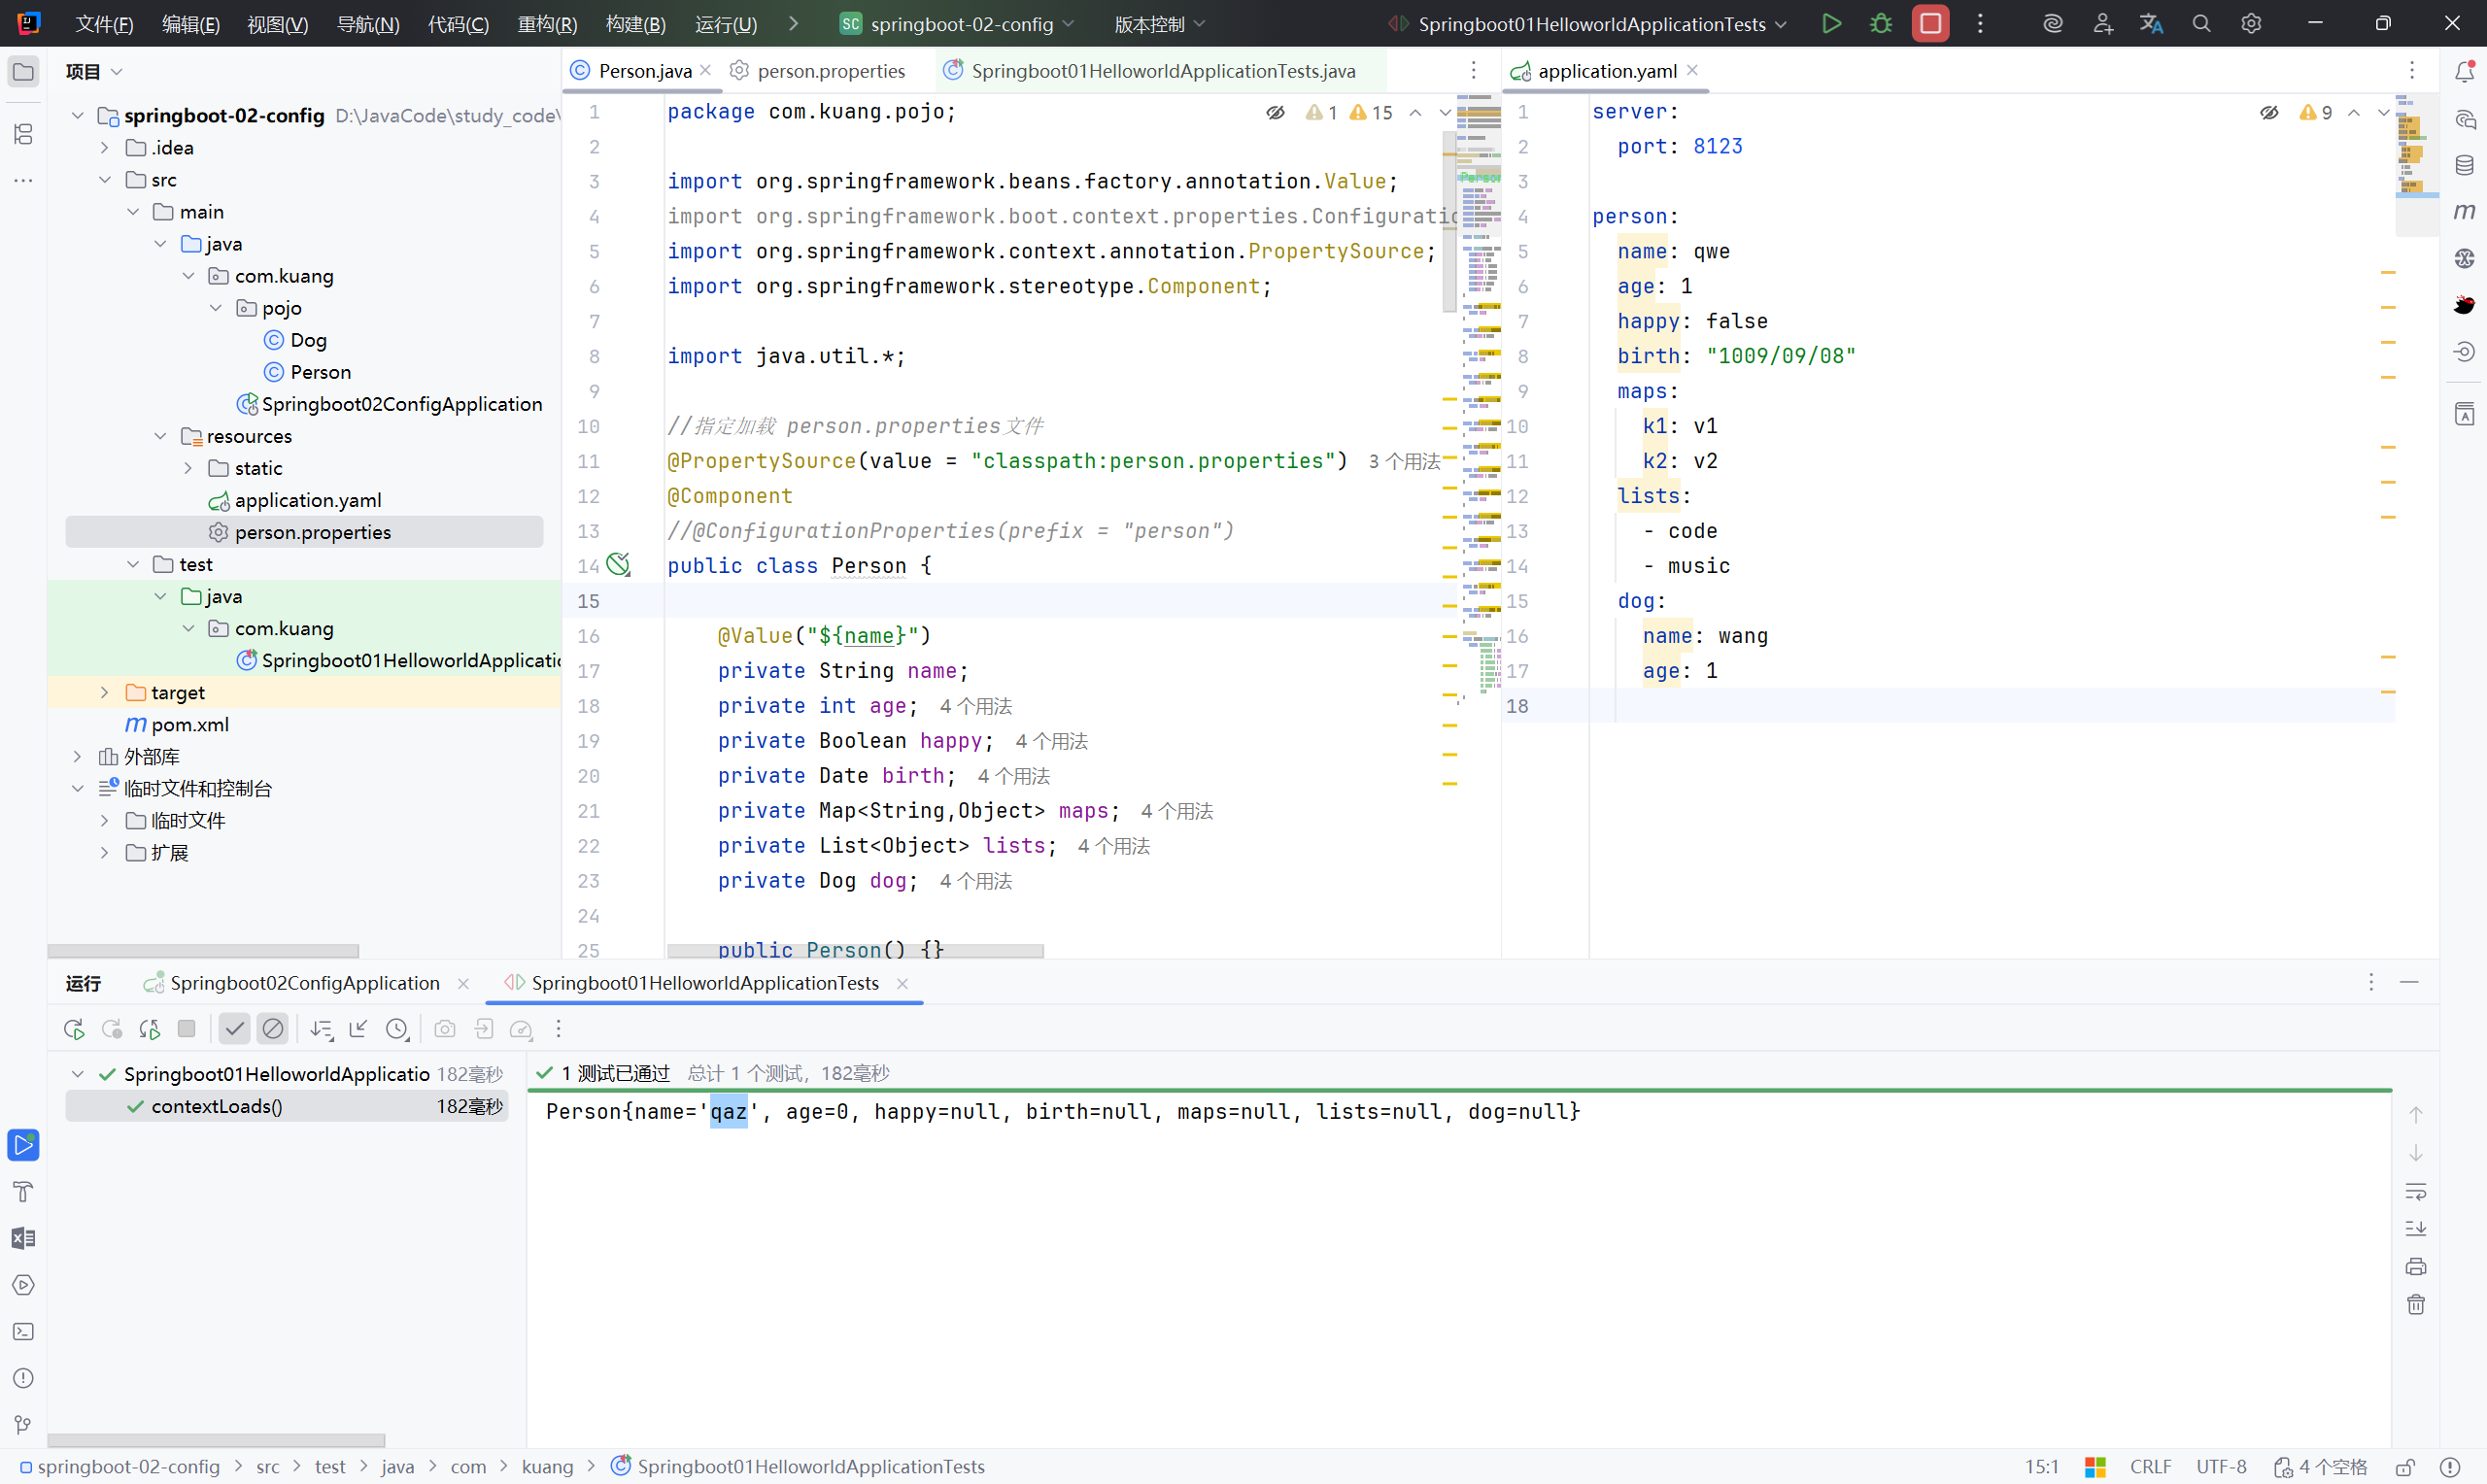
| server:
port: 8123
person:
name: qwe
age: 1
happy: false
birth: "1009/09/08"
maps:
k1: v1
k2: v2
lists:
- code
- music
dog:
name: wang
age: 1
|
 1
 2
 3
 4
 5
 6
 7
 8
 9
10
11
12
13
14
15
16
17
18
19
| package com.kuang;
import com.kuang.pojo.Person;
import org.junit.jupiter.api.Test;
import org.springframework.beans.factory.annotation.Autowired;
import org.springframework.boot.test.context.SpringBootTest;
@SpringBootTest
class Springboot01HelloworldApplicationTests {
@Autowired
private Person person;
@Test
void contextLoads() {
System.out.println(person);
}
}
|
Person{name=‘qwe’, age=1, happy=false, birth=Thu Sep 08 00:00:00 CST 1009, maps={k1=v1, k2=v2}, lists=[code, music], dog=Dog{name=‘wang’, age=1}}

加载指定的配置文件#
@PropertySource :加载指定的配置文件;
@configurationProperties:默认从全局配置文件中获取值;
 1
 2
 3
 4
 5
 6
 7
 8
 9
10
11
12
13
14
| //指定加载 person.properties文件
@PropertySource(value = "classpath:person.properties")
@Component
//@ConfigurationProperties(prefix = "person")
public class Person {
@Value("${name}")
private String name;
private int age;
private Boolean happy;
private Date birth;
private Map<String,Object> maps;
private List<Object> lists;
private Dog dog;
|
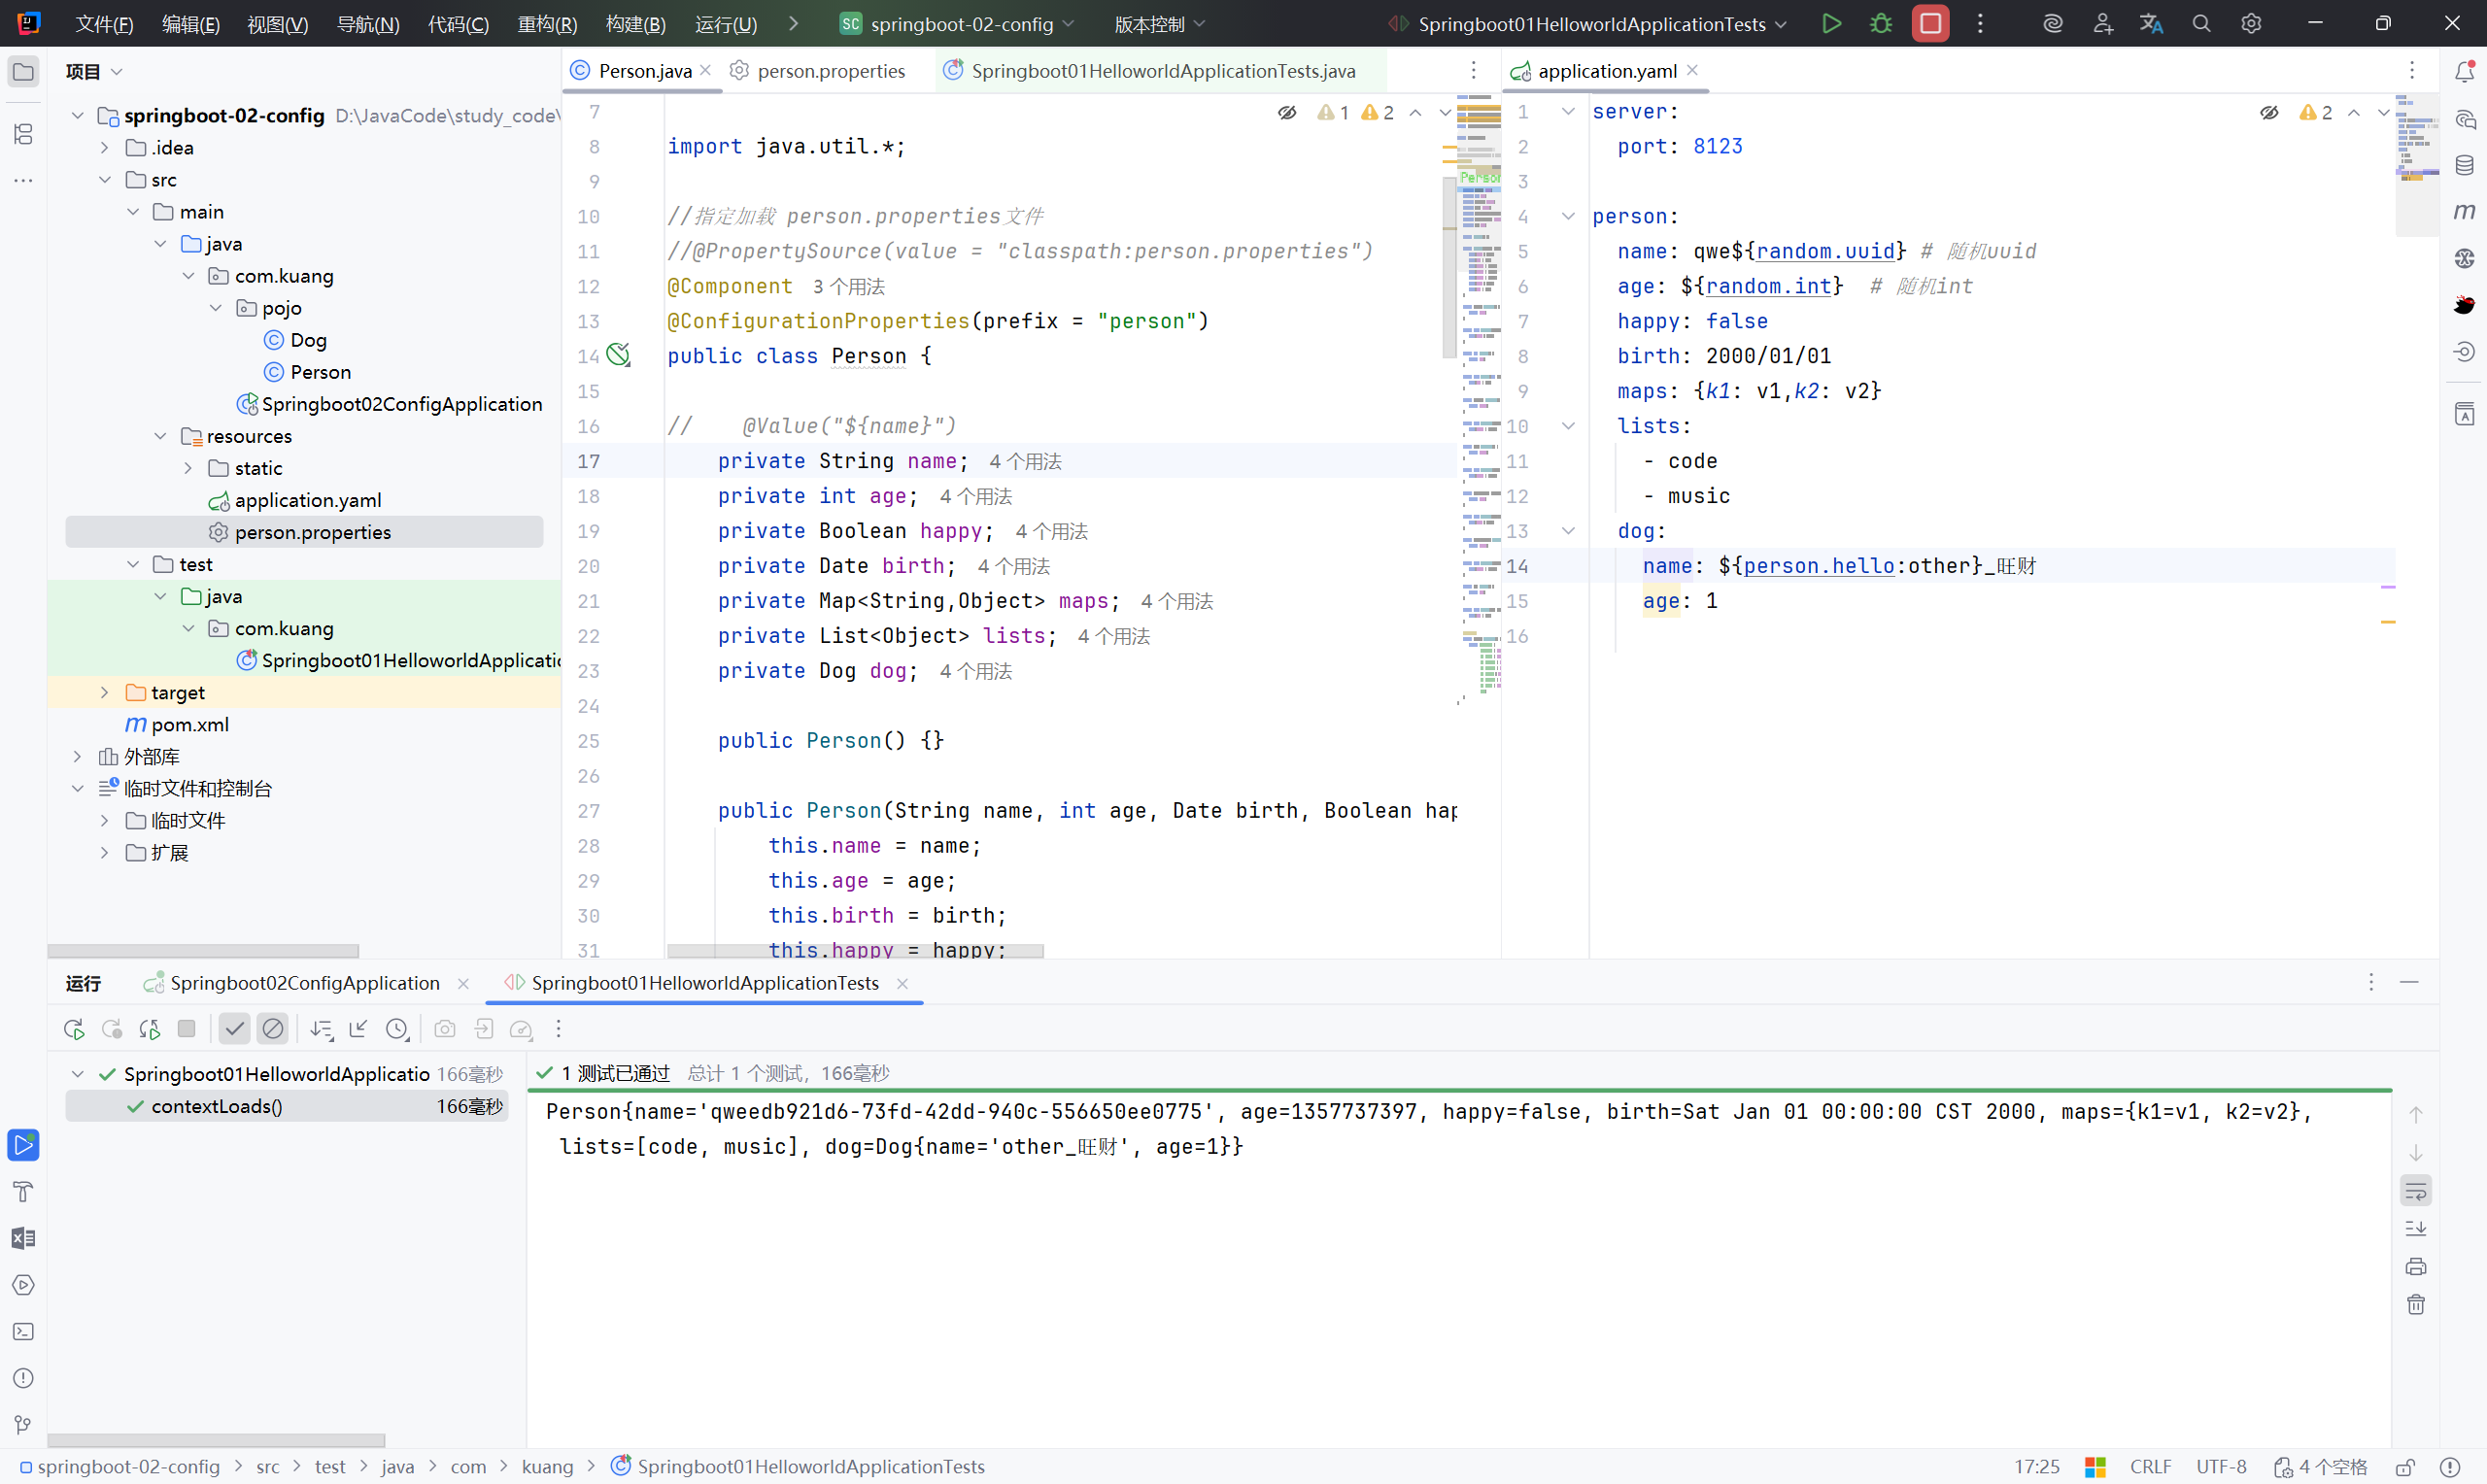
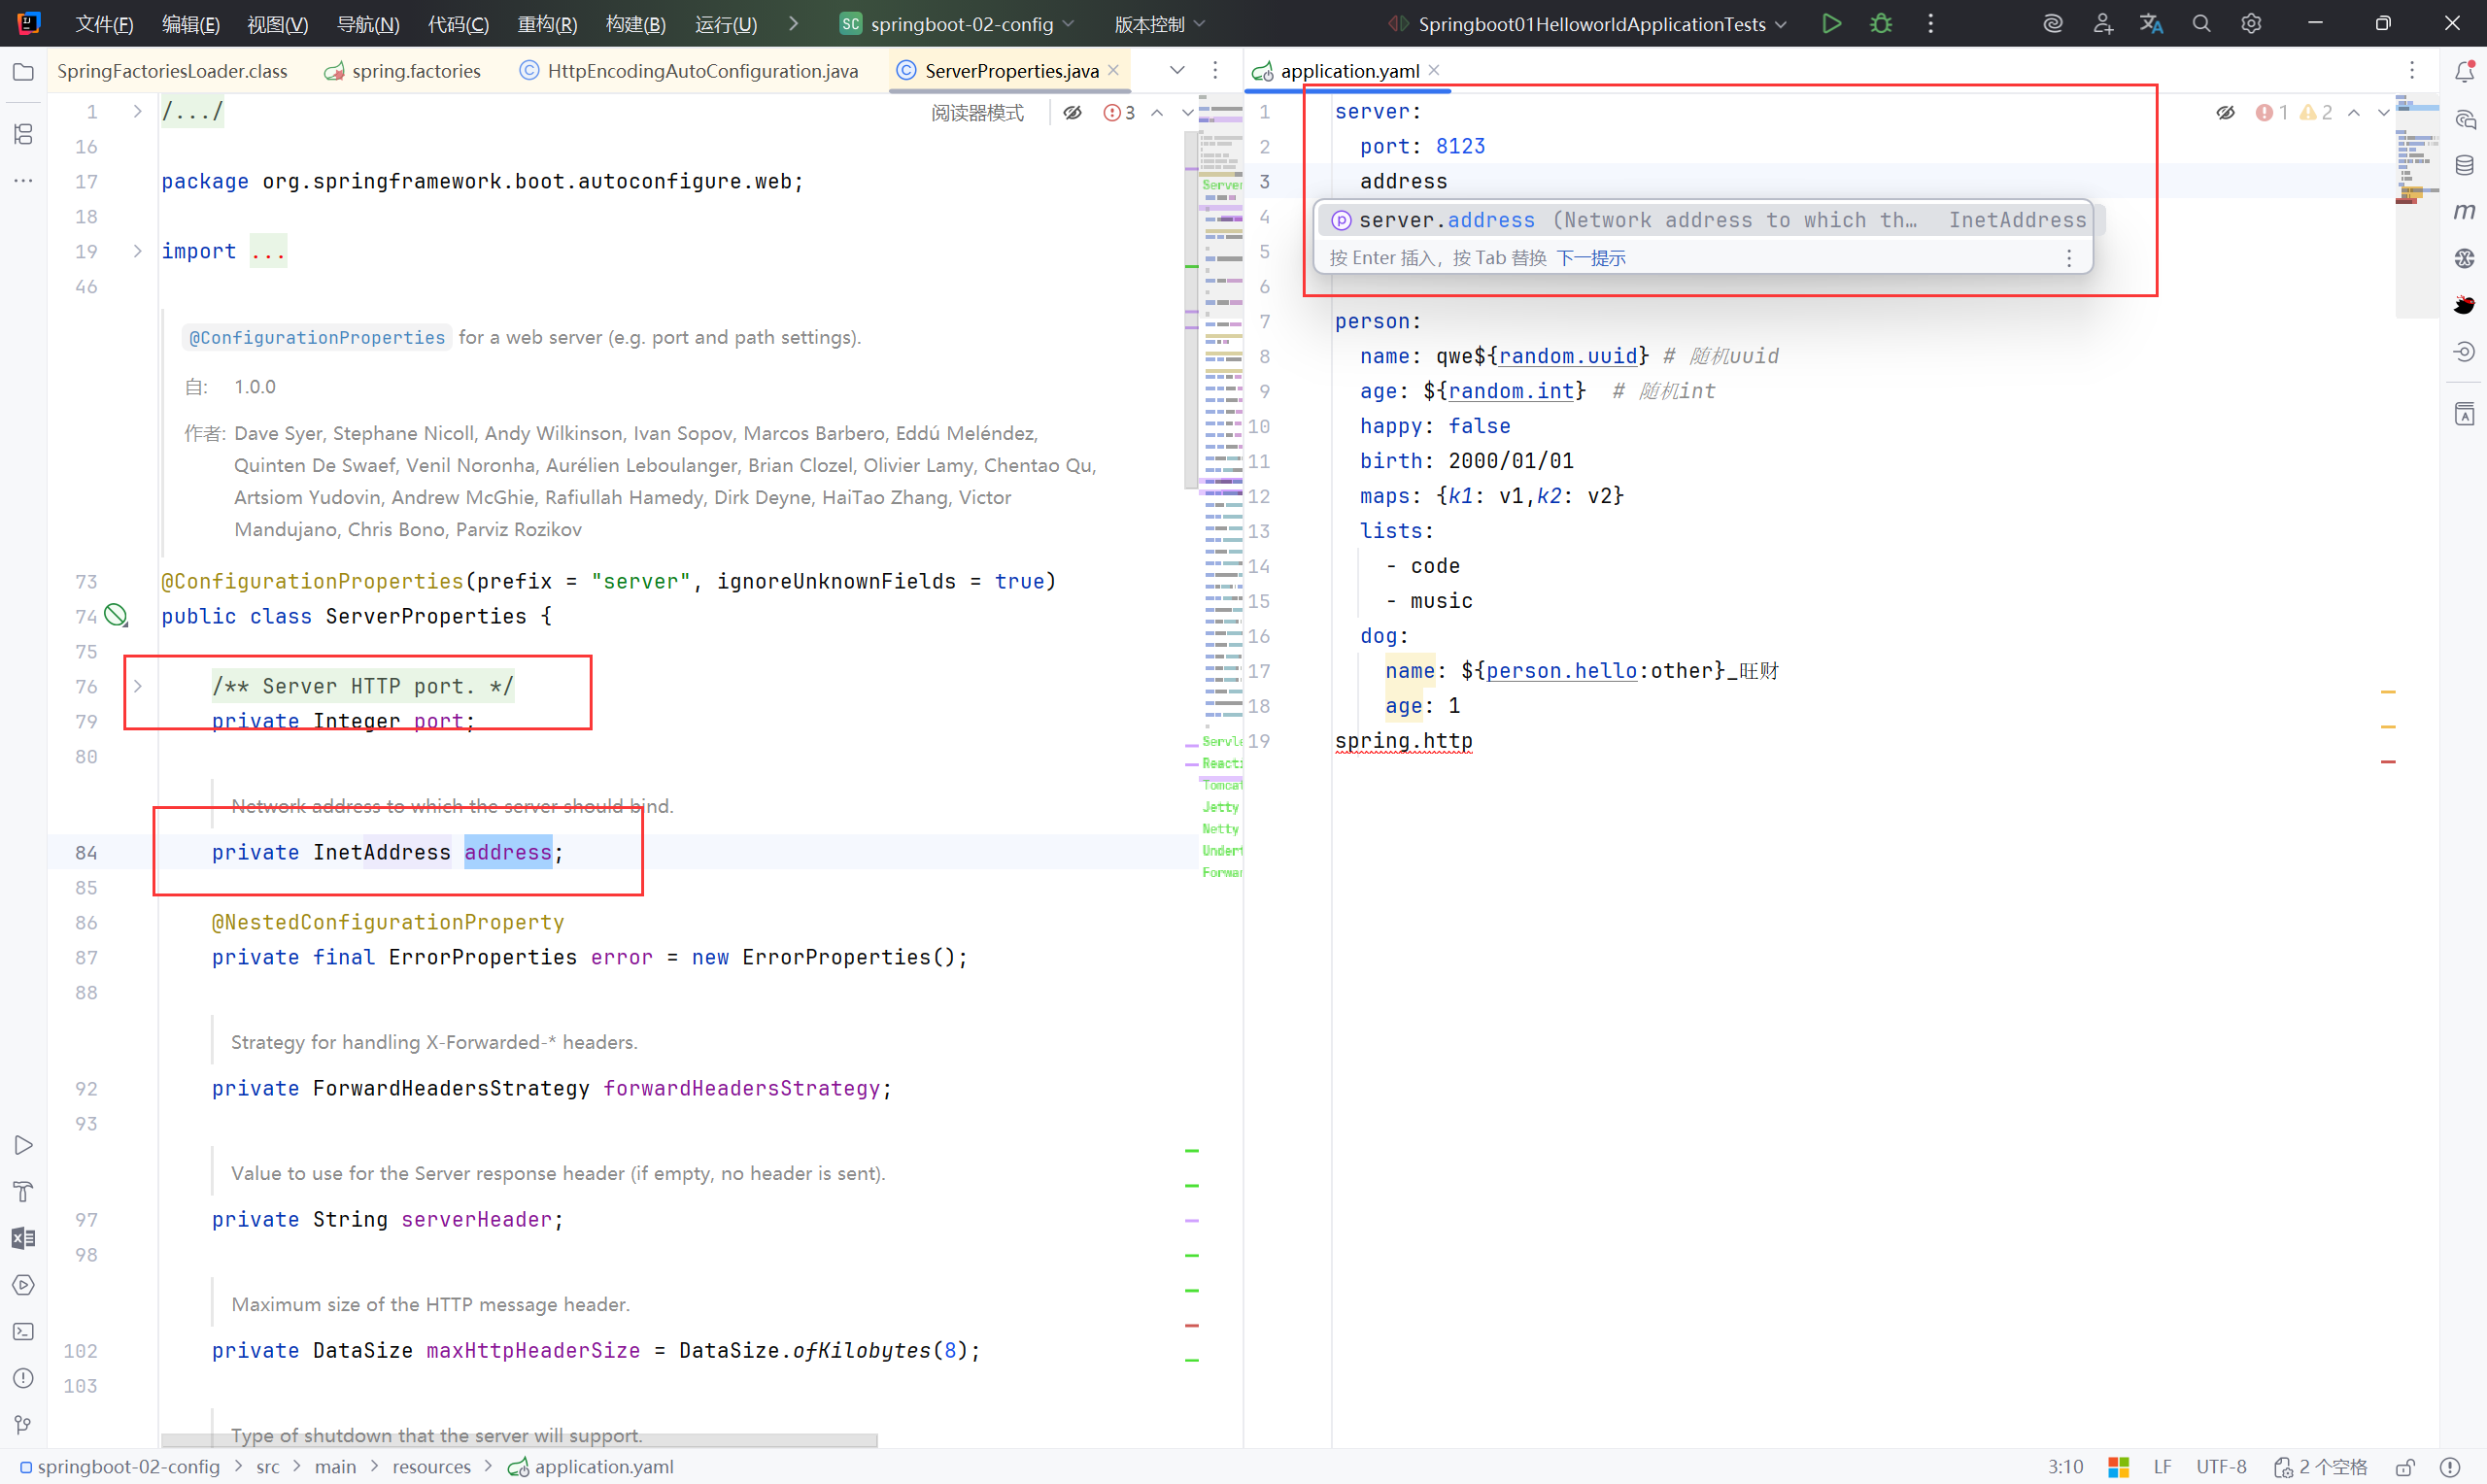
配置文件占位符#
 1
 2
 3
 4
 5
 6
 7
 8
 9
10
11
12
| person:
name: qwe${random.uuid} # 随机uuid
age: ${random.int} # 随机int
happy: false
birth: 2000/01/01
maps: {k1: v1,k2: v2}
lists:
- code
- music
dog:
name: ${person.hello:other}_旺财
age: 1
|
小结:#
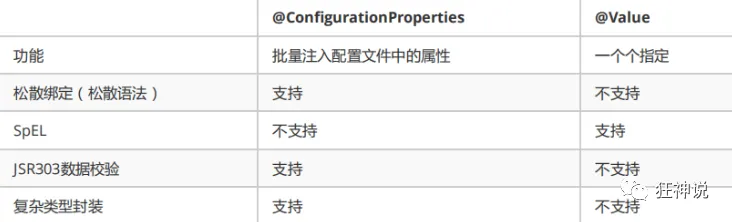
JSR303数据校验 , 可以在字段是增加一层过滤器验证 , 可以保证数据的合法性
松散绑定:yml 中写的 last-name 和 lastName是一样的
复杂类型封装,yml中可以封装对象 , 使用value就不支持
JSR303数据校验#
字段是增加一层过滤器验证 , 可以保证数据的合法性
常见参数:
 1
 2
 3
 4
 5
 6
 7
 8
 9
10
11
12
13
14
15
16
17
18
19
20
21
22
23
24
25
| @NotNull(message="名字不能为空")
private String userName;
@Max(value=120,message="年龄最大不能查过120")
private int age;
@Email(message="邮箱格式错误")
private String email;
#空检查
@Null #验证对象是否为null
@NotNull #验证对象是否不为null, 无法查检长度为0的字符串
@NotBlank #检查约束字符串是不是Null还有被Trim的长度是否大于0,只对字符串,且会去掉前后空格.
@NotEmpty #检查约束元素是否为NULL或者是EMPTY.
#Booelan检查
@AssertTrue #验证 Boolean 对象是否为 true
@AssertFalse #验证 Boolean 对象是否为 false
#长度检查
@Size(min=, max=) #验证对象(Array,Collection,Map,String)长度是否在给定的范围之内
@Length(min=, max=) string is between min and max included.
#日期检查
@Past #验证 Date 和 Calendar 对象是否在当前时间之前
@Future #验证 Date 和 Calendar 对象是否在当前时间之后
@Pattern #验证 String 对象是否符合正则表达式的规则
|
多环境切换#
profile是Spring对不同环境提供不同配置功能的支持,可以通过激活不同的环境版本,实现快速切换环境;
多配置文件#
我们在主配置文件编写的时候,文件名可以是 application-{profile}.properties/yml , 用来指定多个环境版本;
例如:
application-test.properties 代表测试环境配置
application-dev.properties 代表开发环境配置
但是Springboot并不会直接启动这些配置文件,它默认使用application.properties主配置文件;
yaml的多文档块#
和properties配置文件中一样,但是使用yml去实现不需要创建多个配置文件
 1
 2
 3
 4
 5
 6
 7
 8
 9
10
11
12
13
14
15
16
17
| server:
port: 8081
#选择要激活那个环境块
spring:
profiles:
active: prod
---
server:
port: 8083
spring:
profiles: dev #配置环境的名称
---
server:
port: 8084
spring:
profiles: prod #配置环境的名称
|
注意:如果yml和properties同时都配置了端口,并且没有激活其他环境 , 默认会使用properties配置文件的!
配置文件加载位置#
外部加载配置文件的方式十分多,我们选择最常用的即可,在开发的资源文件中进行配置!
springboot 启动会扫描以下位置的application.properties或者application.yml文件作为Spring boot的默认配置文件:
优先级1:项目路径下的config文件夹配置文件
优先级2:项目路径下配置文件
优先级3:资源路径下的config文件夹配置文件
优先级4:资源路径下配置文件
优先级由高到底,高优先级的配置会覆盖低优先级的配置;
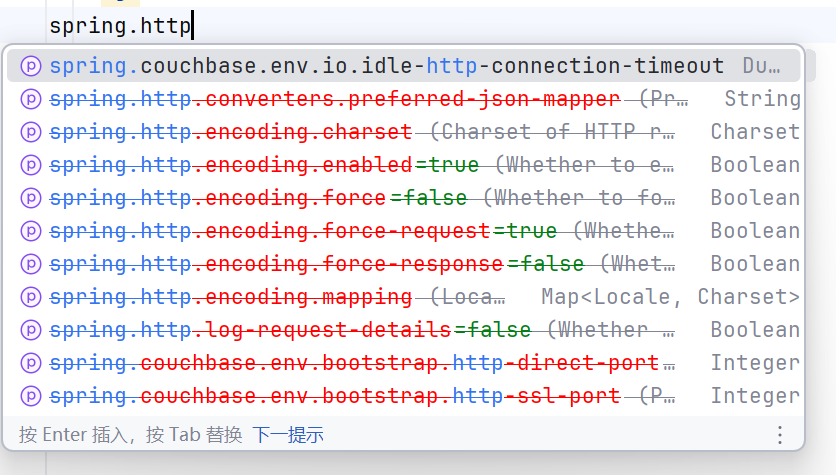
自动配置原理#
来到 META-INF/spring.factories
以其中的 HttpEncodingAutoConfiguration 为例分析
spring.http. 在高版本已经弃用
 1
 2
 3
 4
 5
 6
 7
 8
 9
10
11
12
13
14
15
16
17
18
19
20
21
22
23
24
25
26
27
28
29
| //声明这是 spring 配置类
@Configuration(proxyBeanMethods = false)
//启用对 ServerProperties 的配置属性绑定,Spring Boot 会把配置文件中 server.* 的属性绑定到 ServerProperties 对象中
@EnableConfigurationProperties(ServerProperties.class)
//条件注解,表示此配置类 仅在 Web 应用且使用 Servlet 类型时生效
@ConditionalOnWebApplication(type = ConditionalOnWebApplication.Type.SERVLET)
//表示只有类路径中存在 CharacterEncodingFilter(Spring 提供的过滤器,用于设置请求和响应的字符编码) 时,这个配置才会生效。
@ConditionalOnClass(CharacterEncodingFilter.class)
//条件注解,用于检查 配置文件中某个属性
@ConditionalOnProperty(prefix = "server.servlet.encoding", value = "enabled", matchIfMissing = true)
//从 ServerProperties 中提取编码配置
public class HttpEncodingAutoConfiguration {
private final Encoding properties;
public HttpEncodingAutoConfiguration(ServerProperties properties) {
this.properties = properties.getServlet().getEncoding();
}
//声明一个 Spring Bean,返回类型为 CharacterEncodingFilter
@Bean
@ConditionalOnMissingBean
public CharacterEncodingFilter characterEncodingFilter() {
CharacterEncodingFilter filter = new OrderedCharacterEncodingFilter();
filter.setEncoding(this.properties.getCharset().name());
filter.setForceRequestEncoding(this.properties.shouldForce(Encoding.Type.REQUEST));
filter.setForceResponseEncoding(this.properties.shouldForce(Encoding.Type.RESPONSE));
return filter;
}
|
跟进 ServerProperties.class
 1
 2
 3
 4
 5
 6
 7
 8
 9
10
11
12
13
14
15
16
17
18
19
20
21
| @ConfigurationProperties(prefix = "server", ignoreUnknownFields = true)
public class ServerProperties {
/**
* Server HTTP port.
*/
private Integer port;
/**
* Network address to which the server should bind.
*/
private InetAddress address;
@NestedConfigurationProperty
private final ErrorProperties error = new ErrorProperties();
/**
* Strategy for handling X-Forwarded-* headers.
*/
private ForwardHeadersStrategy forwardHeadersStrategy;
...
|
那么 yaml 中可以写的配置即为
小结:#
xxxxAutoConfigurartion:自动配置类
xxxxProperties: 配置属性类
– debug: true 查看生效的自动配置类
4、SpringBoot Web 开发#
4.1 静态资源#
4.1.1 静态资源映射规则#
WebMvcAutoConfiguration -> EnableWebMvcConfiguration -> addResourceHandlers
 1
 2
 3
 4
 5
 6
 7
 8
 9
10
11
12
13
14
15
16
17
18
19
20
21
22
23
24
25
26
27
28
29
30
31
32
33
34
35
| @Override
public void addResourceHandlers(ResourceHandlerRegistry registry) {
//resourceProperties.isAddMappings() 读取静态资源配置
if (!this.resourceProperties.isAddMappings()) {
logger.debug("Default resource handling disabled");
return;
}
//WebJars 是一种把 JS、CSS 打包成 jar 的方式,这里让 /webjars/... 直接访问到 jar 包里的静态文件
addResourceHandler(registry, "/webjars/**", "classpath:/META-INF/resources/webjars/");
//映射普通静态资源
addResourceHandler(registry, this.mvcProperties.getStaticPathPattern(), (registration) -> {
registration.addResourceLocations(this.resourceProperties.getStaticLocations());
if (this.servletContext != null) {
ServletContextResource resource = new ServletContextResource(this.servletContext, SERVLET_LOCATION);
registration.addResourceLocations(resource);
}
});
}
//提供一个更简化的调用方式,只传 URL 模式和物理路径,不需要自己写 Consumer
private void addResourceHandler(ResourceHandlerRegistry registry, String pattern, String... locations) {
addResourceHandler(registry, pattern, (registration) -> registration.addResourceLocations(locations));
}
private void addResourceHandler(ResourceHandlerRegistry registry, String pattern,
Consumer<ResourceHandlerRegistration> customizer) {
if (registry.hasMappingForPattern(pattern)) {
return;
}
ResourceHandlerRegistration registration = registry.addResourceHandler(pattern);
customizer.accept(registration);
registration.setCachePeriod(getSeconds(this.resourceProperties.getCache().getPeriod()));
registration.setCacheControl(this.resourceProperties.getCache().getCachecontrol().toHttpCacheControl());
registration.setUseLastModified(this.resourceProperties.getCache().isUseLastModified());
customizeResourceHandlerRegistration(registration);
}
|
Webjars本质就是以jar包的方式引入静态资源
https://www.webjars.org/
1
2
3
4
5
| <dependency>
<groupId>org.webjars</groupId>
<artifactId>jquery</artifactId>
<version>3.4.1</version>
</dependency>
|
要使用jQuery,只要要引入jQuery对应版本的pom依赖即可
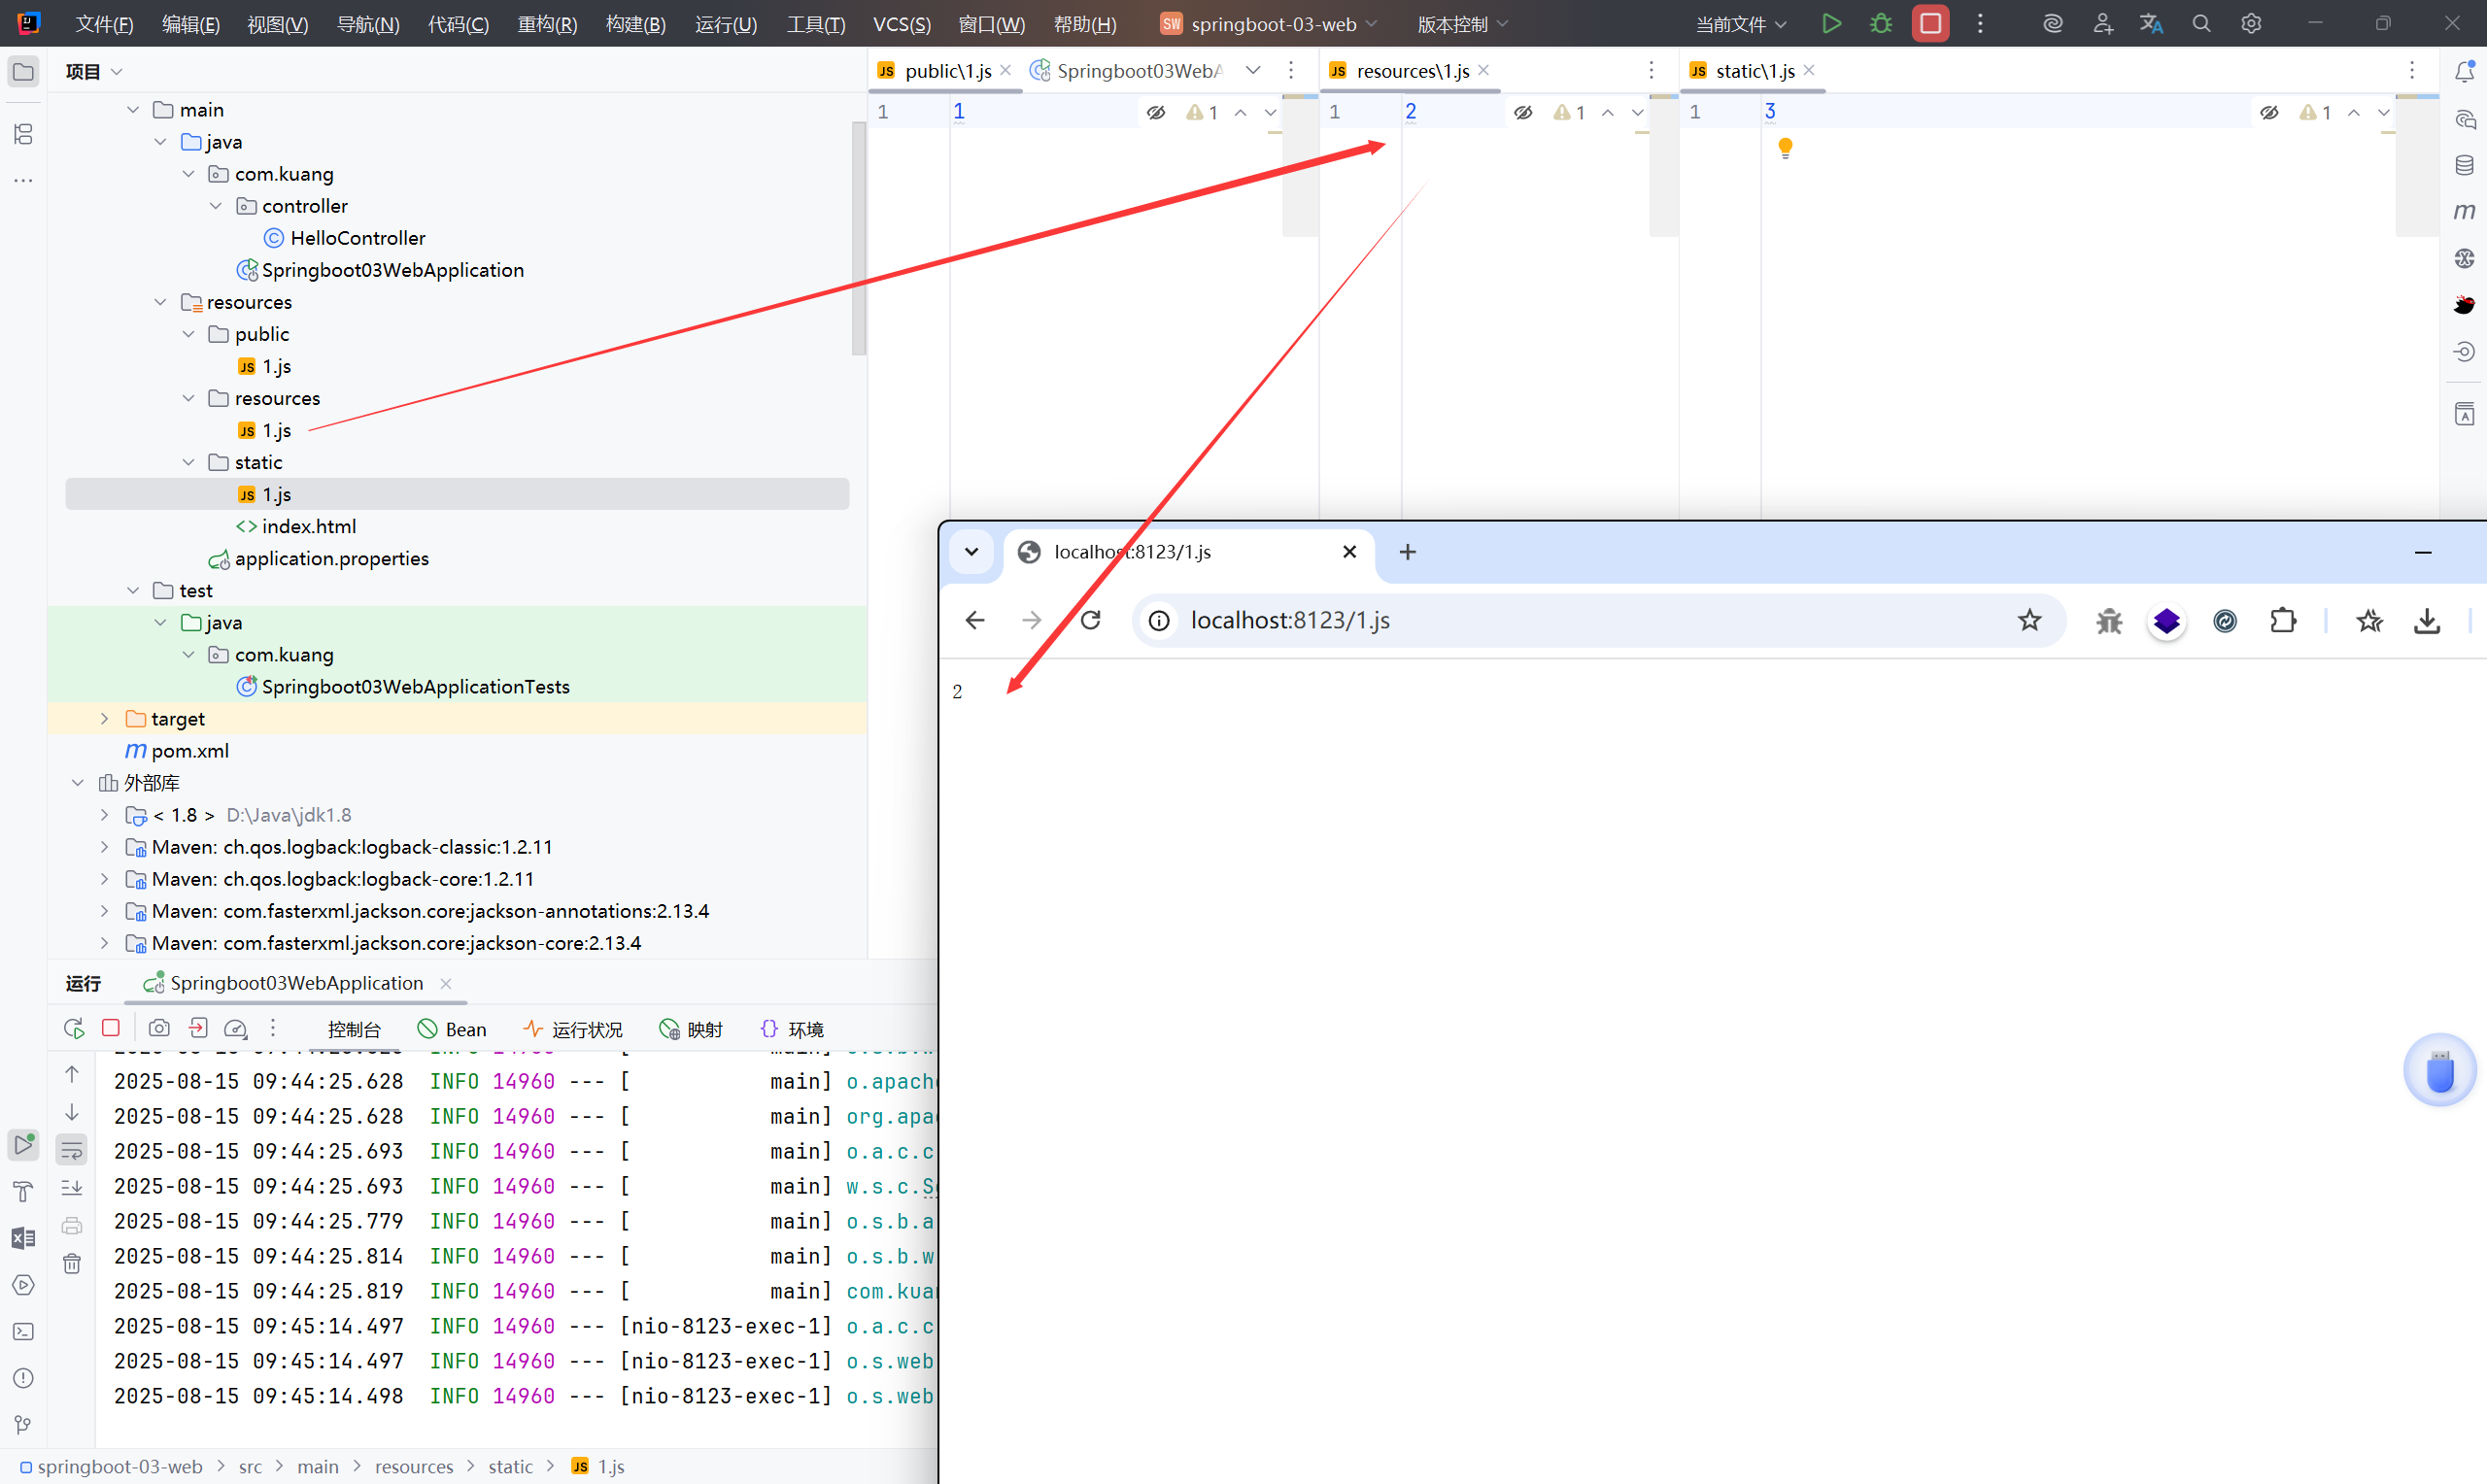
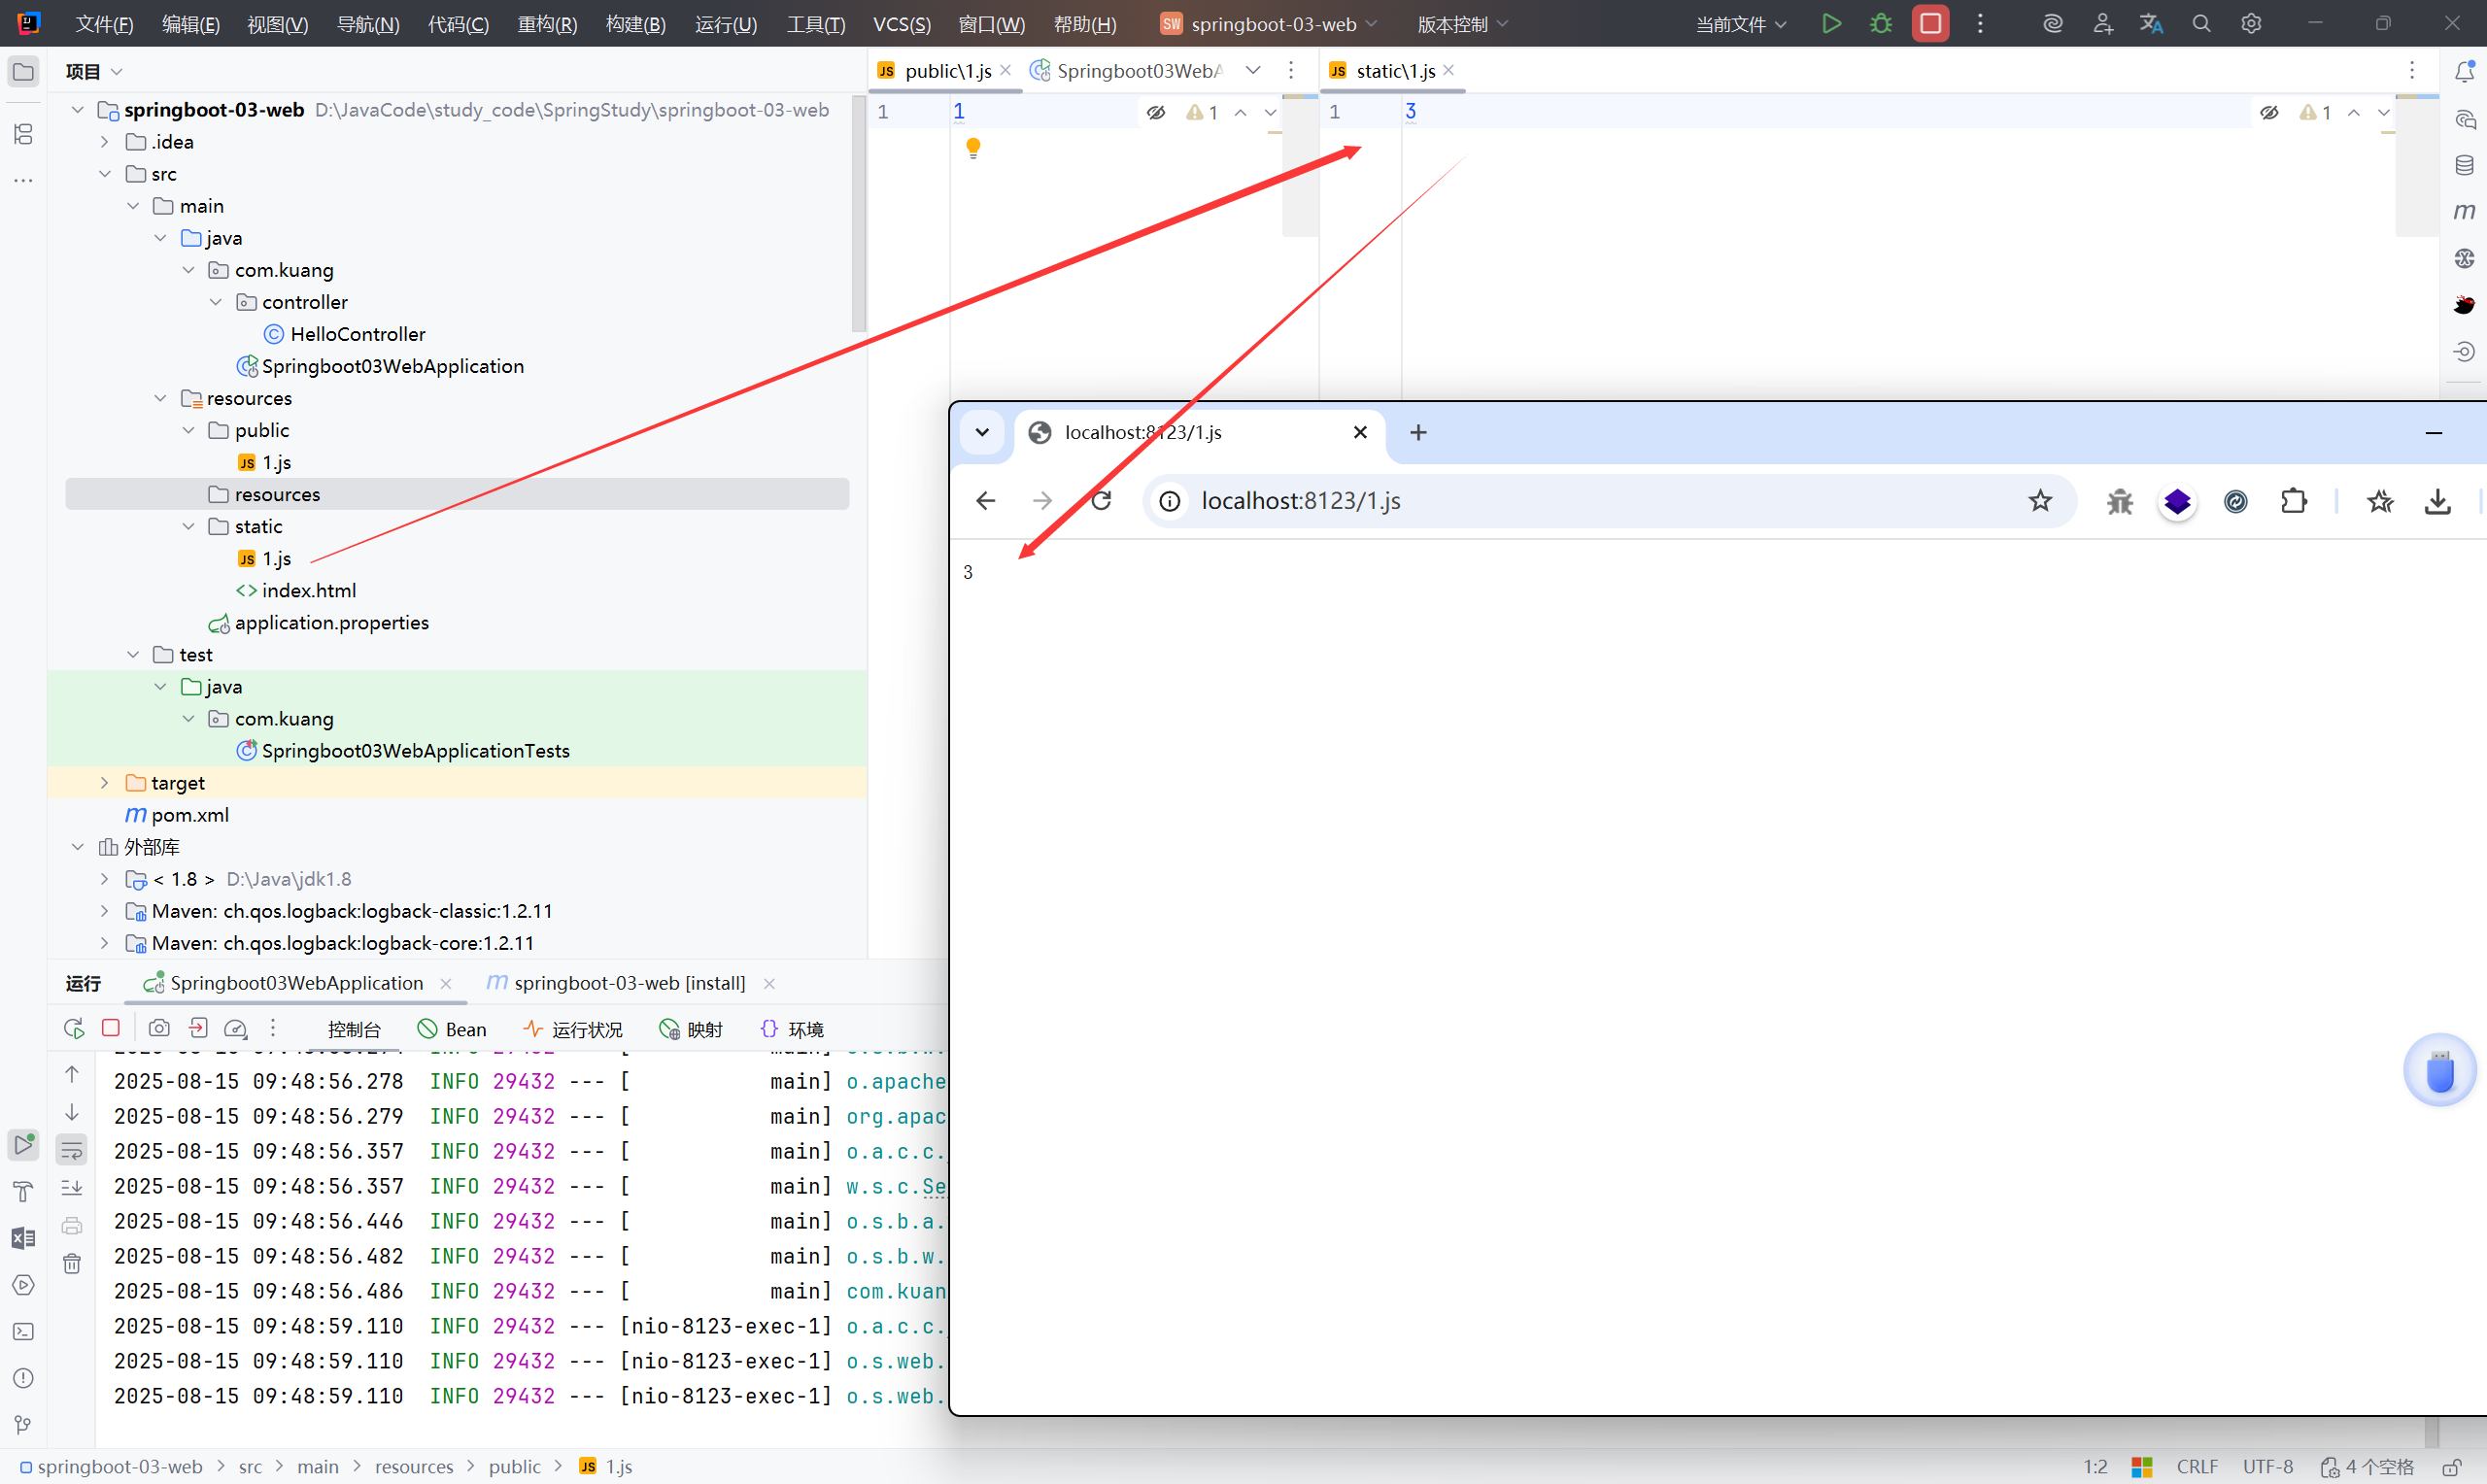
另一种规则:/**
WebProperties -> getStaticLocations -> staticLocations -> CLASSPATH_RESOURCE_LOCATIONS ->
1
2
3
4
5
| //以下四个目录存放的静态资源可以被识别
"classpath:/META-INF/resources/",
"classpath:/resources/",
"classpath:/static/",
"classpath:/public/"
|
1
2
3
4
5
6
7
8
| public String[] getStaticLocations() {
return this.staticLocations;
}
private String[] staticLocations = CLASSPATH_RESOURCE_LOCATIONS;
private static final String[] CLASSPATH_RESOURCE_LOCATIONS = { "classpath:/META-INF/resources/",
"classpath:/resources/", "classpath:/static/", "classpath:/public/" };
|
优先级:resources > static > public
4.1.2 首页#
静态资源文件夹下的所有 index.html 页面
 1
 2
 3
 4
 5
 6
 7
 8
 9
10
11
12
13
14
15
16
17
18
19
20
21
22
23
| @Bean
public WelcomePageHandlerMapping welcomePageHandlerMapping(ApplicationContext applicationContext,
FormattingConversionService mvcConversionService, ResourceUrlProvider mvcResourceUrlProvider) {
WelcomePageHandlerMapping welcomePageHandlerMapping = new WelcomePageHandlerMapping(
//检测模板引擎(Thymeleaf、Freemarker 等)是否可用,以判断欢迎页是模板还是静态文件
new TemplateAvailabilityProviders(applicationContext),
//查找模板、静态文件
applicationContext,
//查找实际的欢迎页资源
getWelcomePage(),
//欢迎页匹配路径模式
this.mvcProperties.getStaticPathPattern()
);
//设置拦截器
welcomePageHandlerMapping.setInterceptors(
getInterceptors(mvcConversionService, mvcResourceUrlProvider)
);
//设置 CORS
welcomePageHandlerMapping.setCorsConfigurations(
getCorsConfigurations()
);
return welcomePageHandlerMapping;
}
|
跟进 getWelcomePage()
 1
 2
 3
 4
 5
 6
 7
 8
 9
10
11
12
13
14
15
| private Resource getWelcomePage() {
//遍历静态资源位置
for (String location : this.resourceProperties.getStaticLocations()) {
Resource indexHtml = getIndexHtml(location);
if (indexHtml != null) {
return indexHtml;
}
}
//检查 ServletContext 下的欢迎页
ServletContext servletContext = getServletContext();
if (servletContext != null) {
return getIndexHtml(new ServletContextResource(servletContext, SERVLET_LOCATION));
}
return null;
}
|
4.2 Thymeleaf模板引擎#
https://www.thymeleaf.org/
https://github.com/thymeleaf/thymeleaf
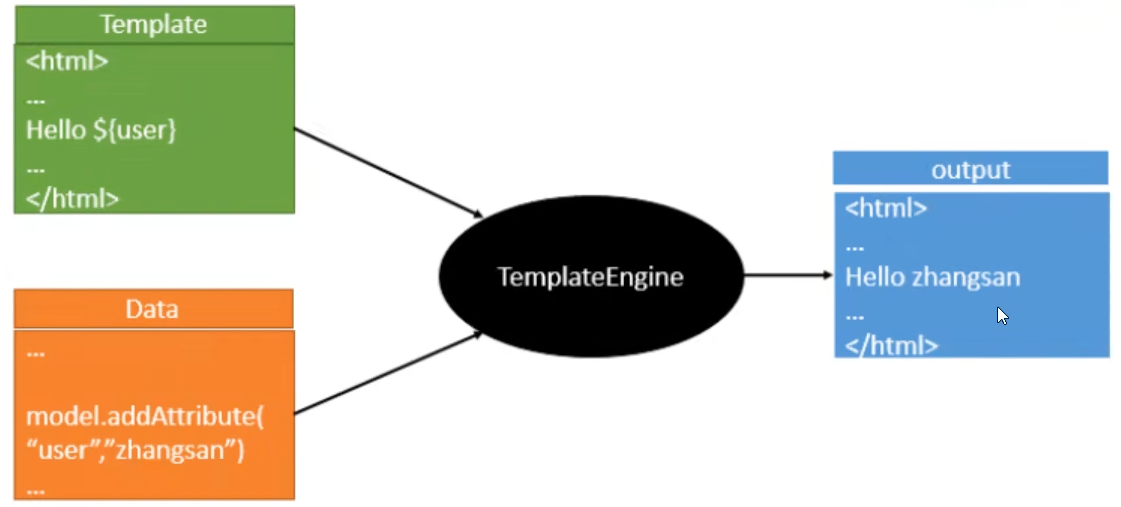
引入依赖
1
2
3
4
5
| <!--thymeleaf-->
<dependency>
<groupId>org.springframework.boot</groupId>
<artifactId>spring-boot-starter-thymeleaf</artifactId>
</dependency>
|
Thymeleaf的自动配置类:ThymeleafProperties
1
2
3
4
5
| @ConfigurationProperties(prefix = "spring.thymeleaf")
public class ThymeleafProperties {
private static final Charset DEFAULT_ENCODING = StandardCharsets.UTF_8;
public static final String DEFAULT_PREFIX = "classpath:/templates/";
public static final String DEFAULT_SUFFIX = ".html";
|
那么只要在 templates 中写 .html 页面就可以完成 Thymeleaf 模板
 1
 2
 3
 4
 5
 6
 7
 8
 9
10
11
12
13
14
| package com.kuang.controller;
import org.springframework.stereotype.Controller;
import org.springframework.web.bind.annotation.RequestMapping;
// 在 templates 目录下的所有页面,只能通过 controller 来跳转
@Controller
public class IndexController {
@RequestMapping("/test")
public String test() {
return "test";
}
}
|
 1
 2
 3
 4
 5
 6
 7
 8
 9
10
| <!DOCTYPE html>
<html lang="en">
<head>
<meta charset="UTF-8">
<title>Title</title>
</head>
<body>
<h1>test</h1>
</body>
</html>
|

4.2.1 Thymeleaf 语法学习#
https://www.thymeleaf.org/documentation.html
yaml 配置:#
1
2
3
4
5
6
7
8
9
| spring:
thymeleaf:
prefix: classpath:/templates/ #指定模板所在的目录
check-template-location: true #检查模板路径是否存在
cache: false #是否缓存,开发模式下设置为false,避免改了模板还要重启服务器,线上设置为true,可以提高性能。
suffix: .html #表示模板文件的后缀
encoding: UTF-8 #设置模板文件的字符编码
content-type: text/html #定渲染后返回的 HTTP 响应类型
mode: HTML5 #Thymeleaf 模板解析模式
|
th 属性#

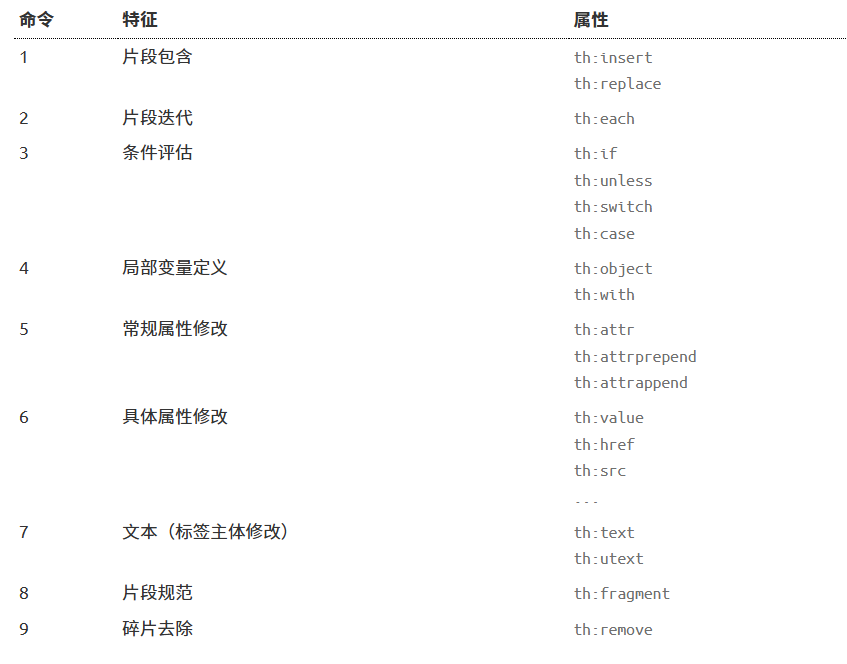
- th:text :设置当前元素的文本内容,相同功能的还有th:utext,两者的区别在于前者不会转义html标签,后者会。优先级不高:order=7
- th:value:设置当前元素的value值,类似修改指定属性的还有th:src,th:href。优先级不高:order=6
- th:each:遍历循环元素,和th:text或th:value一起使用。注意该属性修饰的标签位置,详细往后看。优先级很高:order=2
- th:if:条件判断,类似的还有th:unless,th:switch,th:case。优先级较高:order=3
- th:insert:代码块引入,类似的还有th:replace,th:include,三者的区别较大,若使用不恰当会破坏html结构,常用于公共代码块提取的场景。优先级最高:order=1
- th:fragment:定义代码块,方便被th:insert引用。优先级最低:order=8
- th:object:声明变量,一般和*{}一起配合使用,达到偷懒的效果。优先级一般:order=4
- th:attr:修改任意属性,实际开发中用的较少,因为有丰富的其他th属性帮忙,类似的还有th:attrappend,th:attrprepend。优先级一般:order=5
标准表达式语法#
- Simple expressions:
- Variable Expressions:
**<font style="color:rgb(112, 112, 112);">${...}</font>** - Selection Variable Expressions:
**<font style="color:rgb(112, 112, 112);">*{...}</font>** - Message Expressions:
**<font style="color:rgb(112, 112, 112);">#{...}</font>** - Link URL Expressions:
**<font style="color:rgb(112, 112, 112);">@{...}</font>** - Fragment Expressions:
**<font style="color:rgb(112, 112, 112);">~{...}</font>**
~{…} 代码块表达式#
- 推荐:
~{templatename::fragmentname} - 支持:
~{templatename::#id}
templatename:模版名,Thymeleaf会根据模版名解析完整路径:/resources/templates/templatename.html,要注意文件的路径。
fragmentname:片段名,Thymeleaf通过th:fragment声明定义代码块,即:th:fragment="fragmentname"
id:HTML的id选择器,使用时要在前面加上#号,不支持class选择器。
#{…} 消息表达式#
@{…} 链接表达式#
链接表达式好处:不管是静态资源的引用,form表单的请求,凡是链接都可以用@{…} 。这样可以动态获取项目路径,即便项目名变了,依然可以正常访问。
链接表达式结构:
- 无参:@{/xxx}
- 有参:@{/xxx(k1=v1,k2=v2)} 对应url结构:xxx?k1=v1&k2=v2
- 引入本地资源:@{/项目本地的资源路径}
- 引入外部资源:@{/webjars/资源在jar包中的路径}
${…}变量表达式#
变量表达式功能:
- 可以获取对象的属性和方法
- 可以使用ctx,vars,locale,request,response,session,servletContext内置对象
- 可以使用dates,numbers,strings,objects,arrays,lists,sets,maps等内置方法(重点介绍)
常用的内置对象:
- ctx :上下文对象。
- vars :上下文变量。
- locale:上下文的语言环境。
- request:(仅在web上下文)的 HttpServletRequest 对象。
- response:(仅在web上下文)的 HttpServletResponse 对象。
- session:(仅在web上下文)的 HttpSession 对象。
- servletContext:(仅在web上下文)的 ServletContext 对象
常用的内置方法:
- strings:字符串格式化方法,常用的Java方法它都有。比如:equals,equalsIgnoreCase,length,trim,toUpperCase,toLowerCase,indexOf,substring,replace,startsWith,endsWith,contains,containsIgnoreCase等
- numbers:数值格式化方法,常用的方法有:formatDecimal等
- bools:布尔方法,常用的方法有:isTrue,isFalse等
- arrays:数组方法,常用的方法有:toArray,length,isEmpty,contains,containsAll等
- lists,sets:集合方法,常用的方法有:toList,size,isEmpty,contains,containsAll,sort等
- maps:对象方法,常用的方法有:size,isEmpty,containsKey,containsValue等
- dates:日期方法,常用的方法有:format,year,month,hour,createNow等
*{…} 选择变量表达式#
4.3 MVC自动配置原理#
https://springdoc.cn/spring-boot/web.html#web.servlet